Food

Gluten free and extra spicy vegan gingersnaps; a modern take on an ancient cookie by Suzanne

Gingersnaps appeared commercially in the mid 1800s but we can trace this cookie’s roots to medieval times. It’s believed to have been invented by monks in 13th century Germany.

Typically, gingersnaps are flavoured with molasses and spices like cinnamon, clove, ginger and nutmeg. They’re prepared in varying textures and thicknesses too.

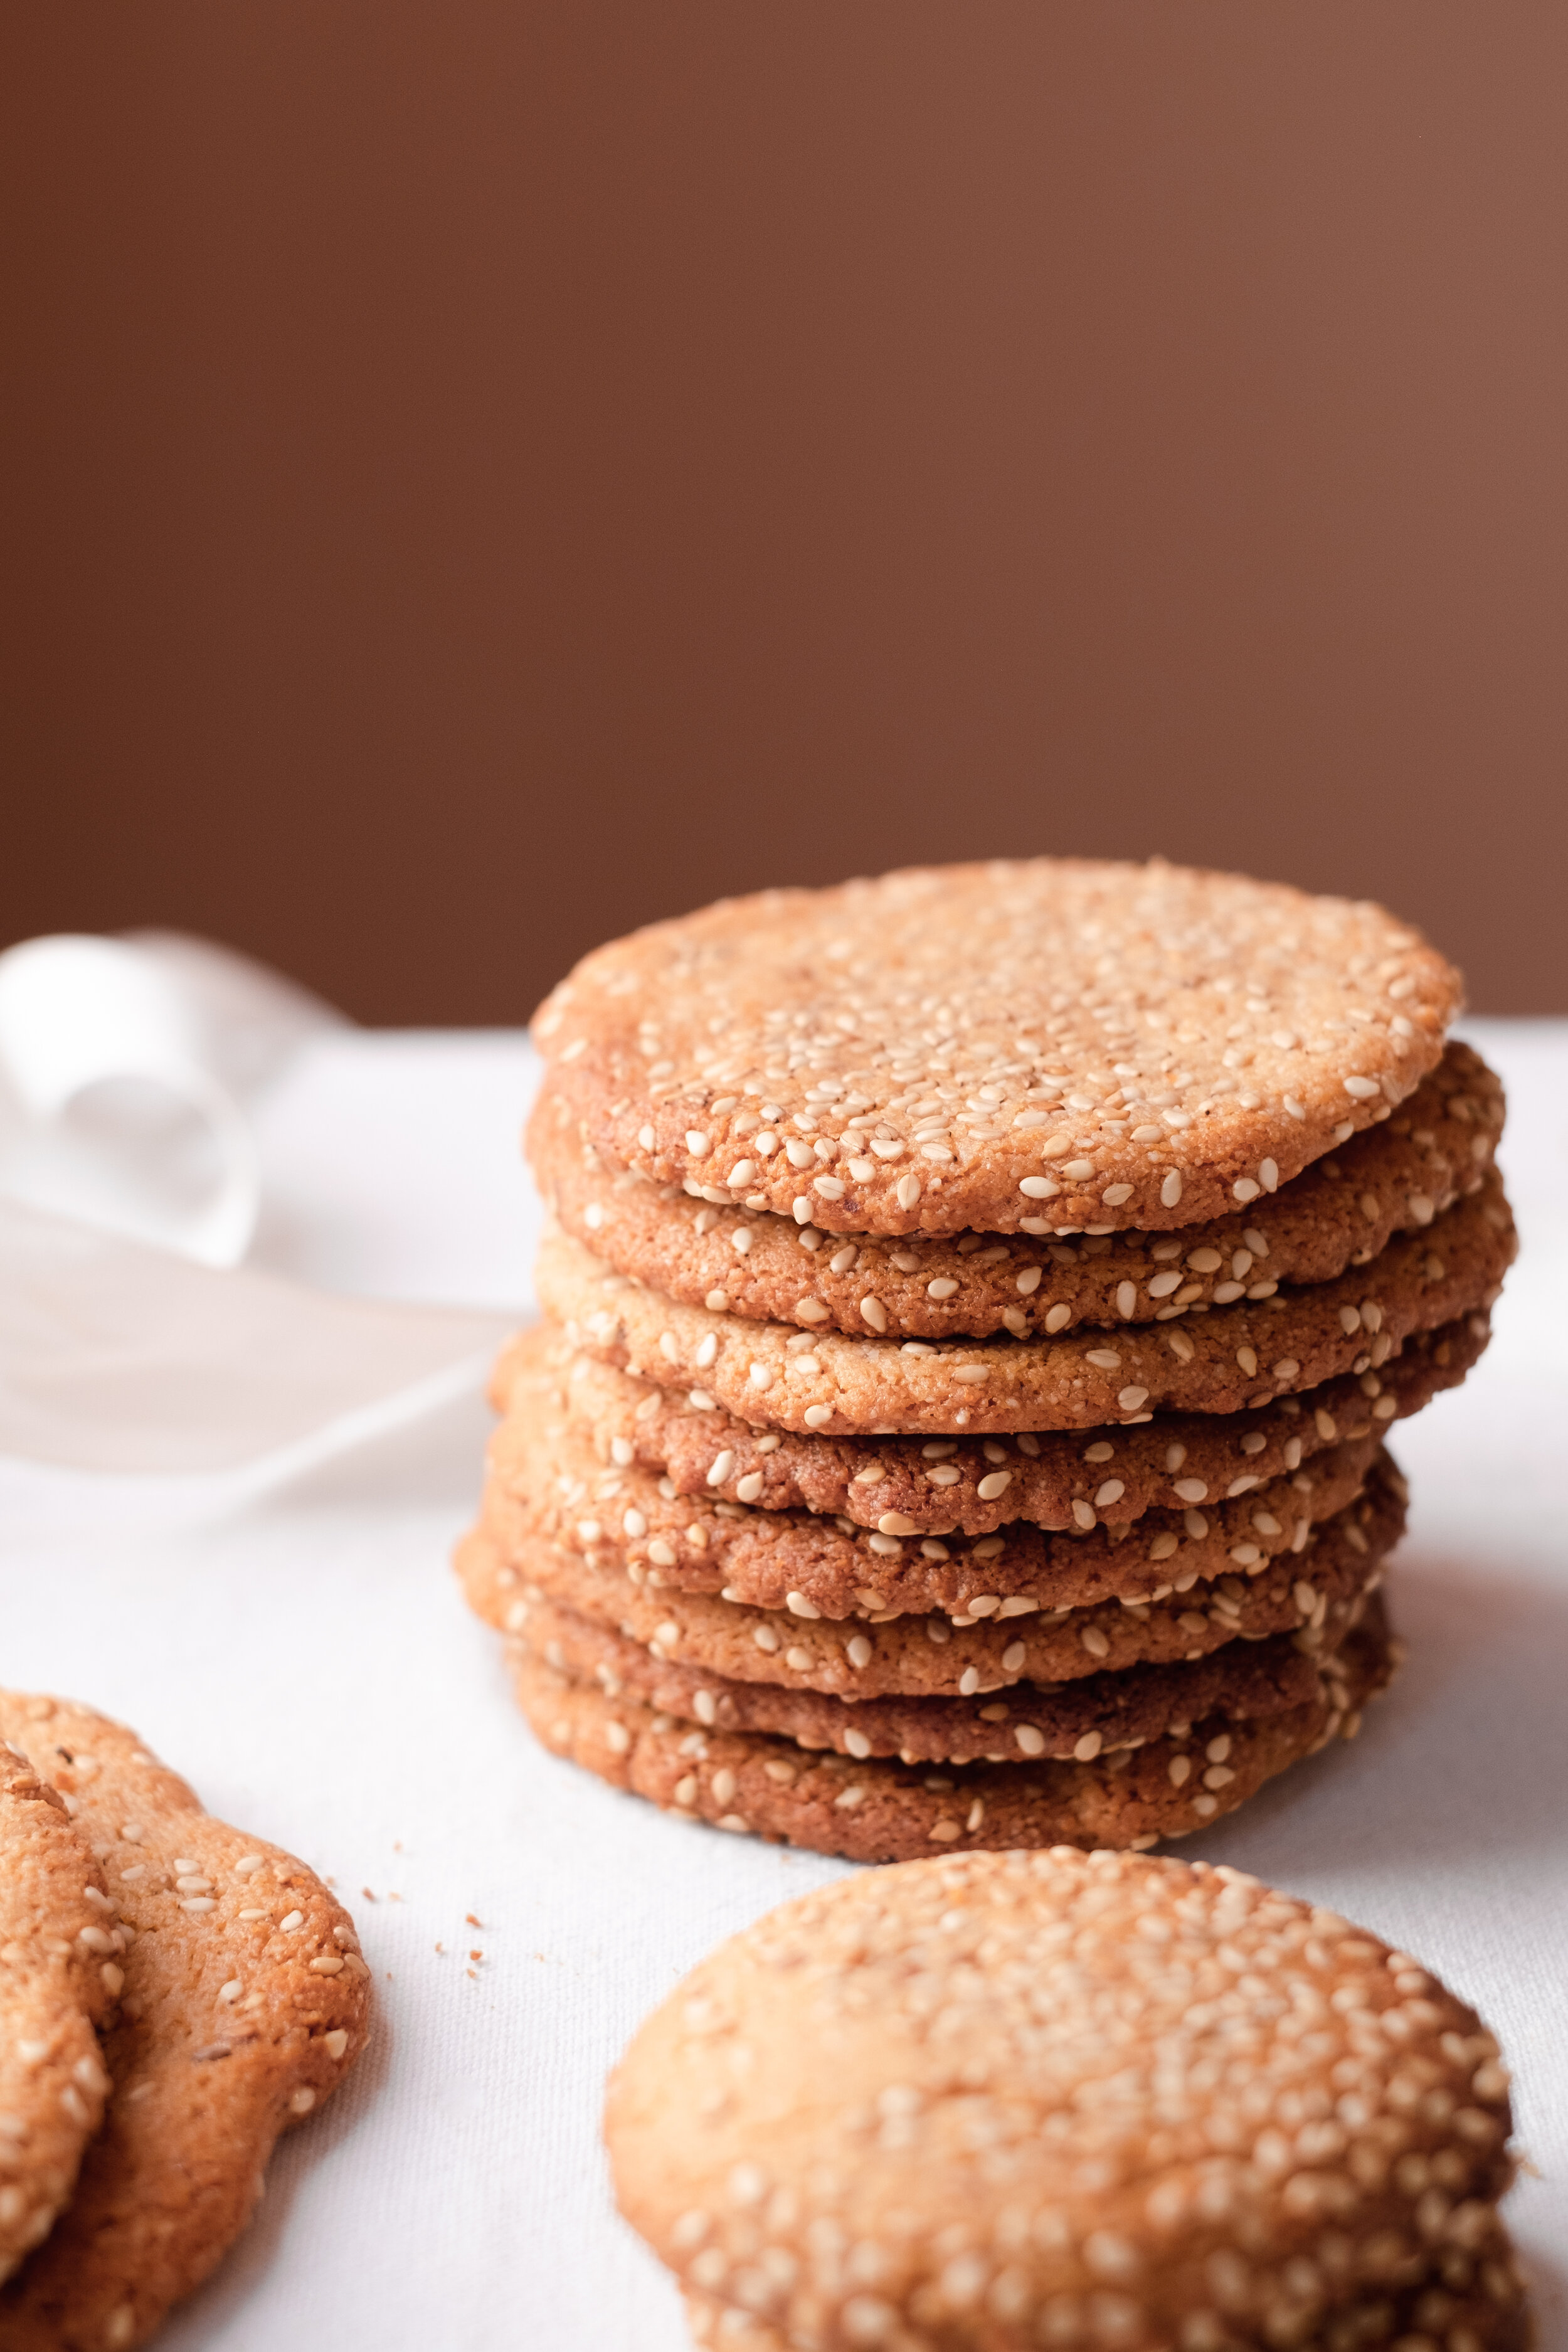
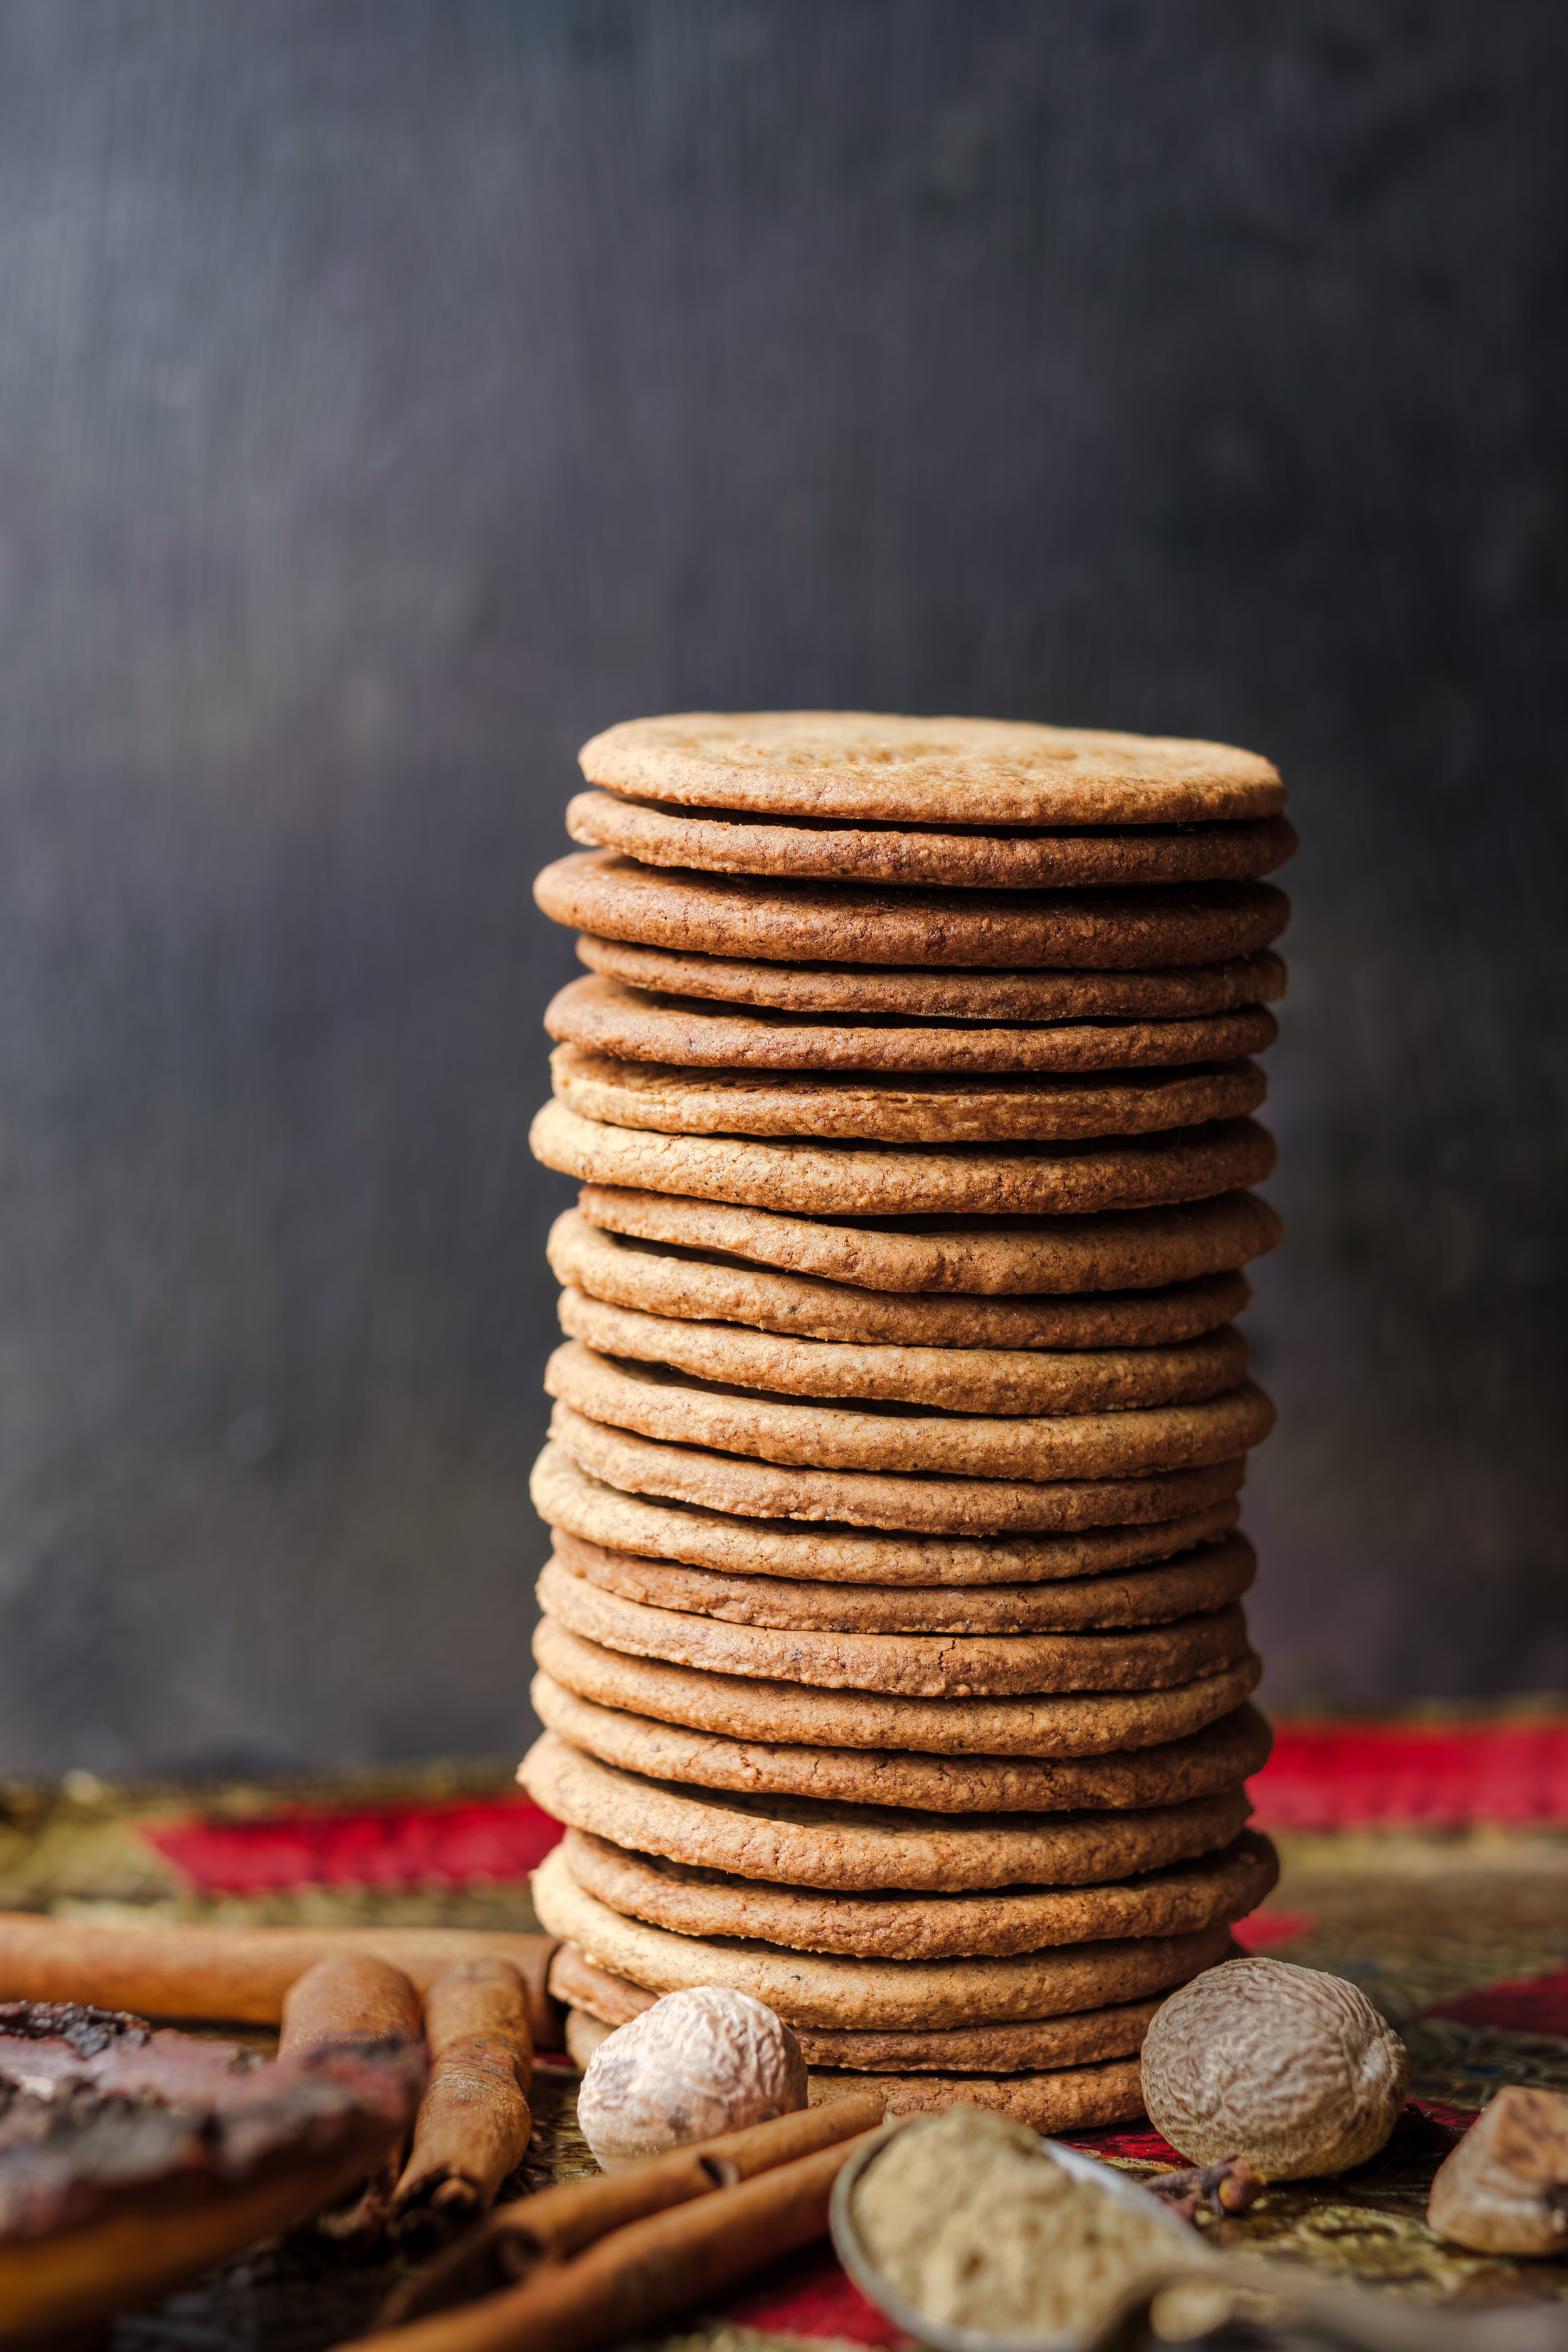
I love versions that are crisp on the edges and chewy in the middle but this is not that kind of gingersnap. This one lives up to the name! It’s got an amazing light crispness and crunch.

This is a strongly flavoured cookie. I increase the amount of spice from that used in the original recipe and I include ground cloves and freshly ground black pepper. I use ground nutmeg in a pinch but I much prefer whole nutmeg, grated with a microplane. If you're out of ground cloves, like I was, grind a few whole cloves. And why not! Although it’s not necessary, using freshly ground spices rewards you with extra warmth and flavour.

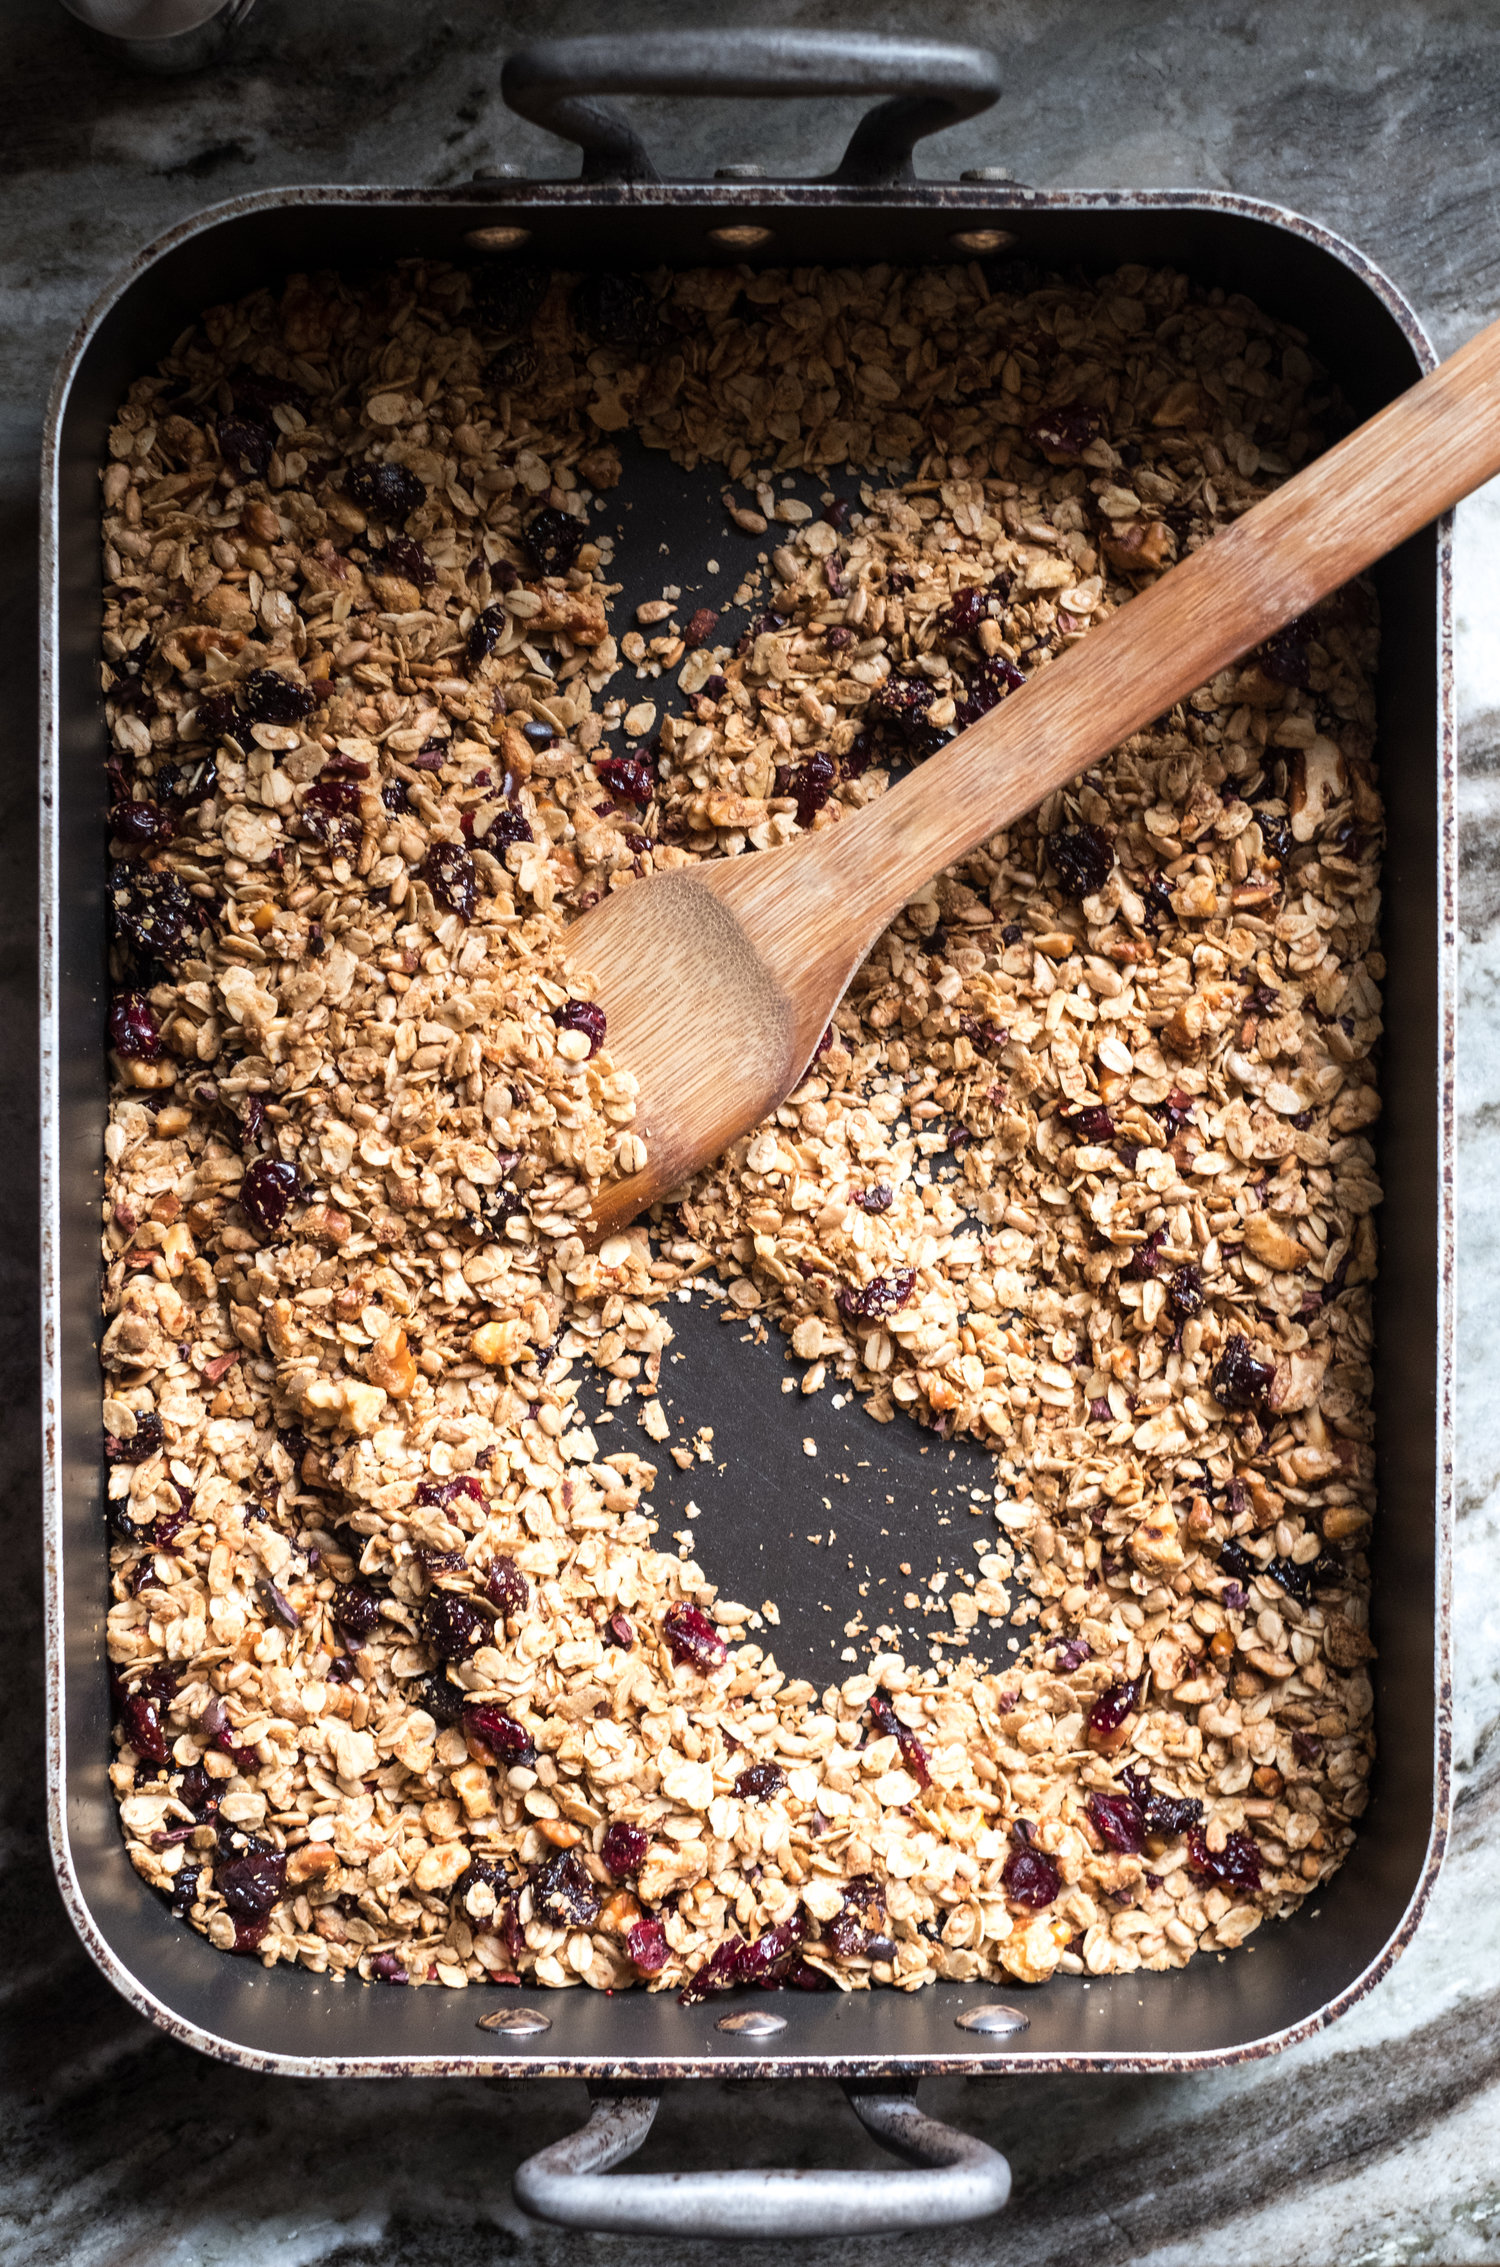
You can even grind rolled oats if you don't have oat flour.  For one cup of oat flour add a cup and a bit more of rolled oats to the food processor and blend until it becomes a flour.

The cookie dough comes together beautifully and is easy to roll out. But I had some trouble transferring the unbaked cookies onto the cookie sheet. It was a warm day and the dough had softened and warmed quickly, and it was a challenge to scoop up the cookies without them losing their nice flat round shapes.

Briefly chilling the dough AGAIN - after you roll it out and before you start cutting the shapes - helps a lot, as does using a metal spatula lightly dusted with flour to scoop up the cookies.

Here’s another way to insure your cookies keep their shape. After you press the cookie cutter into the chilled dough and make all the shapes, carefully roll away excess dough from around the cookies and leave them on the parchment, undisturbed. Then slide the parchment onto the cookie sheet.

Of course it doesn't matter if the shapes get wobbly and the cookies aren’t uniform. They will still be delightfully crisp and taste delicious.

Yet it's quite nice to see them neatly stacked, all relatively the same shape and size, especially if you intend to gift them. The brittle structure of these gingersnaps makes them an excellent cookie to package and give away.

Original recipe here.

Gluten free and extra spicy vegan gingersnaps (makes about 30 cookies)

1/4 cup maple syrup

3 Tbsp coconut sugar or brown sugar (or even white sugar, I've tried them all, successfully.)

3 Tbsp melted coconut oil

2 Tbsp molasses

2 tsp ground ginger

2 tsp ground cinnamon

1/4 tsp ground nutmeg

1/4 of ground ground clove

freshly ground black pepper, about 10 turns of the pepper grinder

1/2 tsp baking soda

1/4 tsp sea salt

1 cup oat flour

1/2 cup almond flour 

1/4 cup arrowroot flour/starch

Preheat the oven to 350 degrees F (176 C).

Line two large baking sheets with parchment paper.

Begin by mixing together the maple syrup, coconut sugar, melted coconut oil, molasses, ginger, cinnamon, nutmeg, clove, black pepper, baking soda and sea salt until well combined.

Then add in your oat flour, almond flour and arrowroot starch and mix with a stiff spoon until everything is blended well.

Form the dough into a flattened disc, wrap in parchment and refrigerate for 30 minutes.

Remove from the fridge and allow the dough to rest for a minute then place in the centre of a sheet of parchment paper lightly dusted with some arrowroot starch. Lightly dust the top of the dough with more arrowroot starch and place another sheet of parchment paper on top and begin to roll the dough into a large circle about 1/16-inch thick. Rolling your dough as thinly as possible results in cookies that are light and crisp. Place the dough in the refrigerator once more to chill for 5 to 10 minutes.

Use a cookie cutter to cut out as many cookies as you can. I used a small drinking glass with an approximate 2 1/2 inch diameter with the rim lightly dusted with arrowroot starch.

Now you have options.

Use a metal spatula lightly dusted with arrowroot starch to transfer the cookie shapes onto your parchment-lined baking sheet about 1 inch apart.

Or do as I did and remove the excess dough from around the cookie shapes and leave them in place on the parchment. Then lift or slide the parchment paper carefully onto the cookie sheet.

Combine remaining dough scraps and repeat until all of the dough is used up.

Bake the cookies for 9 to12 minutes. The longer you bake them the crisper and darker they will be. Cool on the pan for 10 minutes before transferring to a cooling rack.

Store in an airtight container for several days at room temperature, and for even longer in the refrigerator and freezer. You can also freeze the dough and defrost in the refrigerator before rolling out to bake.

Fudgy chocolate muffins with or without ganache, vegan and gluten free by Suzanne

Fudgy chocolate muffins, vegan and gluten free

This recipe is definitely one for the archives, especially if you like a dense chocolate muffin that’s vegan and gluten free.

These muffins do double duty.

They are nourishing enough to have at breakfast with coffee or tea, especially if you throw some roughly chopped walnuts in the batter.

Adding in a handful of dark chocolate chips brings excitement and into cupcake status. You may not feel the need for any frosting at this point. But if inclined, dust with powdered sugar or top with ganache. I’ve included a delicious and reliable vegan ganache recipe, below.

One more thing; you mix these in one bowl.

Fudgy chocolate muffins, vegan and gluten free

Fudgy chocolate muffins, vegan and gluten free

Makes about 11 - 12 muffins. Adapted from this recipe.

2 medium-size ripe bananas

1 tbsp ground flaxseed plus 2 ½ tbsp water (or 1 egg)

1 ½ tsp baking soda

1/2 cup coconut sugar (or brown sugar)

3 Tbsp maple syrup

1/4 cup tahini (or other nut or seed butter of choice)

1/4 tsp sea salt

1/2 tsp pure vanilla extract

2 tbsp melted coconut oil or olive oil (or plant butter)

1/2 cup cocoa powder, sifted if clumpy

1/4 cup plus 2 tablespoons coconut flour (or 3/4 cup rolled oats)

1 1/4 cup almond flour

1/4 cup dark chocolate chips or chopped dark chocolate (optional)

handful of roughly chopped walnuts (optional)

Preheat oven to 350 degrees F and line muffin tin with paper cupcake wrappers.

In a large mixing bowl add banana, ground flaxseed and water. Mash to combine until fairly smooth.

Add baking soda, coconut sugar, maple syrup, tahini, sea salt, vanilla and oil, and whisk vigorously to combine.

Add cocoa powder and whisk again.

Add coconut flour (or gluten-free rolled oats) and stir to combine. Add almond flour, a little at a time, and stir to combine. If you find your batter too dry, thin with a bit of water. If it’s too wet, add a bit more more almond flour. The batter should be scoopable.

Lastly, if using, add chocolate chips and/or walnuts, and stir to combine.

Divide batter between muffin tins, filling almost all the way to the top.

Bake on the centre rack for 25-30 minutes. When cooked, a toothpick inserted into the centre will come out clean.

Let rest for 5 minutes and then transfer muffins to a cooling rack to cool completely. The wrappers come off more easily and the texture is best when completely cooled.

Ganache:

4 oz 100% cocoa baking chocolate

4 tablespoons coconut oil (melted)

2 tablespoons maple syrup

1 cup coconut milk

9 pitted medjool dates

Over very low heat or in a double boiler melt coconut oil and chocolate. Once melted, remove from heat. Add to blender along with coconut milk, maple syrup and dates. Blend until consistency is smooth. You can chill in the fridge before spreading but I prefer to let it sit at room temperature until it becomes thick enough. That way it maintains a more creamy texture, ideal for spreading. 

Fudgy chocolate muffins, vegan and gluten free

Orange olive oil muffins, gluten free by Suzanne

gluten free orange olive oil muffins

I find myself clenching my jaw lately. No doubt it’s because I’ve been paying more attention to what’s happening in the world as is reported to me, and digesting the hard truths like the fact that ignorance and white supremacist attitudes run so very deep. I can’t imagine what it’s like trying to live your life in a status quo where you are devalued and feel under threat. I’m very lucky all I feel is a sore jaw.

I find distraction and escape curled up on the couch next to Simon watching a good tv series.

I recently (reluctantly) approved Simon’s choice - a Netflix’s South Korean zombie series called Kingdom. It spans several genres: fantasy, horror, thriller, historical and political drama.

If you can’t imagine watching horror then consider Kingdom as a period piece. It’s set in the 16th century Korea, the sets and costumes are sumptuous, the story is engrossing and the cinematography is incredibly artful. 

But the gore is over the top!

I needed to hide my face in my hands at least twice an episode. But I grew so enthralled with the series I eagerly agreed to watch the second season, which was also excellent.

At first it seemed Kingdom was escapist fantasy but not far into the series it became uncannily relevant to current events.

The show’s main plot is about a mysterious disease spreading rapidly through an unsuspecting populace as government officials hide the terrible truth. And the main characters are constantly running towards hope. See what I mean?  

Rather than the plague itself, the show is about the different characters and how they respond. One of the show’s creators said the question he held in his mind while writing the tv series was: Who is an upright leader that truly thinks of the people in the midst of a crisis brought on by an unknown disease?

And to think the pandemic wasn’t even on the horizon at the time of filming. How serendipitous!

Now for the muffin recipe, which involves adding an entire seedless and unpeeled orange to this recipe.

Orange, olive oil and almond flour play beautifully together and the result is an aromatic, delicious, light, moist muffin dappled with tiny dots of orange. The orange flavour is predominant yet also mellow.

I haven’t experimented but I imagine you could use any type of orange, as long as you remove any seeds. You could also bake this in a loaf pan and adjust the baking time to about 10 minutes longer. To serve as dessert, decorate with icing and flower petals, which I just might try.

gluten free orange olive oil muffins

Gluten Free Orange Olive Oil Muffins (makes approx 8 large muffins)

One seedless orange, whole and unpeeled

3 eggs

1/2 cup maple syrup

1/3 cup olive oil

1/2 tsp sea salt

1/4 cup coconut flour

1 1/2 cups almond flour

1 tsp baking soda

Place orange in pot of water and bring to a boil.

Reduce heat, cover and allow to simmer for 1 hour.

Drain water and allow orange to cool.

Preheat the oven to 350 F' and grease a muffin tin or use liners.

Slice orange into sections and remove any seeds. Add to food processor along with eggs, oil and maple syrup. Blend well.

In a separate bowl add the coconut flour, almond flour, baking soda and salt. Whisk well.

Add wet mixture to dry mixture and combine well.

Distribute the batter between cups. Bake on the middle rack for 25 to 30 minutes or until a toothpick comes out clean. 

Let cool before removing from tin. 

gluten free orange olive oil muffins

Tahini brownies, flourless by Suzanne

tahini brownies, flouless

Chocolate and tahini are a winning combination and these brownies are the proof.

Two whole cups of tahini - a paste made from ground toasted sesame seeds, which comes from middle eastern cuisine - disappear into these brownies making them moist and fudgy with a crackly, crinkly crust on the top.

tahini brownies, flourless

Here are a few tips before you give this recipe a try:

Be mindful of the baking time so that you get a nice balance between cakey and gooey. The difference between a baking time of 23 minutes and 25 minutes can be significant! Fudgy and wet are not the same thing, so avoid under baking.

On the other hand, if you have a “hot” oven and it’s been 23 minutes, and you see the edges getting darker, pull them from the oven and let them rest.

Allow them to COMPLETELY cool before slicing, otherwise they can lose their integrity.

Cut them in bite size squares and eat with your hands as a mid-afternoon snack. Cut into larger squares or triangles and serve on a pretty plate with a scoop of ice cream for a more elegant presentation.

These brownies keep for several days in an airtight container. They also freeze well. Take one from the freezer and eat at the half-thawed stage or briefly warm in the microwave first.

To make the tahini flavour really shine make these a day in advance of serving. The colour and flavour of the tahini intensifies over time.

tahini brownies, flourless

Tahini brownies, flourless (original recipe here)

2 cups tahini

2 eggs

1 1/4 cup maple syrup

1/2 cup cocoa

1 teaspoon baking soda

1 teaspoon salt

1 tablespoon vanilla extract

1 cup dark chocolate (roughly chopped) or chocolate chips, optional

Preheat oven to 350 F.

Line an 8×8 pan with parchment paper with enough over hang to allow you to lift brownies out of the pan.

In a bowl, stir together tahini, eggs, maple syrup and vanilla extract.

Add cacao, baking soda, salt and stir until batter is formed.

Slowly fold in chopped chocolate or chocolate chips, if using, and pour into prepared pan.

Bake for 25 minutes on the middle rack of your oven.

Remove from oven and allow to cool in the pan for 10 minutes. Then, holding on to the ends of the parchment, carefully lift brownies out of pan by holding on to the ends.

Allow to completely cool before cutting.

tahin brownies, flourless
tahini brownies, flourless

Honey tahini cookies by Suzanne

honey tahini cookies

Tahini is an essential ingredient in hummus but it makes desserts sing too.

Tahini is a creamy paste made with ground toasted sesame seeds and a common ingredient in Middle Eastern cuisine. If you’ve never added tahini to anything sweet this cookie recipe is a good place to start.

Think of this cookie as peanut butter cookie’s exotic cousin! The tahini provides a wonderful nutty and salty undertone to match the honey’s intense flavour. Tahini is also nutrient-dense. It has more protein than milk and most nuts, is a rich source of B vitamins, vitamin E, and important minerals, such as magnesium, iron and calcium.

honey tahini cookies

Here are a few notes about this recipe:

Play with the crisp to chewy ratio by adjusting the size and thickness of the rounds of cookie dough as well as the baking time.

I like mine crisp and thin. My sweet spot is a cookie flattened by hand to about a 2 inch diameter, slightly less than a 1/4 inch thick and baked for 7 minutes.

I use creamed honey and I swear it makes for a lighter and crispier cookie but liquid honey does the trick too.

If you can’t imagine these without chocolate, you can (once cooled) drizzle cookies with gently melted dark chocolate.

honey tahini cookies
honey tahini cookies drizzled with melted chocolate

Honey tahini cookies

1/2 cup sesame seeds

1 1/2 cups almond flour

1/2 teaspoon baking soda

1/4 teaspoon sea salt

1/3 cup creamed honey (liquid honey will do too)

1/3 cup tahini

1 teaspoon vanilla extract

optional : 1/3 cup dark chocolate, melted

Preheat the oven to 350° F and line 2 baking sheets with parchment paper.

Spread the sesame seeds in a plate or bowl.

In a small bowl, whisk the almond flour, baking soda and salt.

In a larger bowl, mix the honey, tahini and vanilla extract.

Add the dry ingredients to the wet ingredients and stir until well incorporated.

Scoop the dough into 1 inch balls. Roll the balls in the sesame seeds, place on baking sheets about 2 inches apart and flatten.

Bake the cookies for about 7 minutes, or until the bottoms are golden; shift the pans from top to bottom halfway through. Transfer the cookies to a rack and let cool before serving. Drizzle with melted chocolate if desired.

honey tahini cookies

Stuffed sweet potatoes with beans and guacamole by Suzanne

stuffed sweet potatoes with beans and guacamole

This vegetarian dish looks wonderful and tastes delicious. The combination of roasted sweet potatoes, spicy beans and tangy guacamole is a treat for eye and palate. You can’t help but stop and admire how it looks on your plate before digging in.

I also appreciate the ease with which you can adapt this recipe to suit your tastebuds. Play with the amount of spice or with substitutes. If you don’t have cayenne, you might use chilli powder or the slightly milder paprika. If you don’t care for feta, top with grated cheddar, etc.

Another great thing is you can prepare the components of this dish in advance. Even the guacamole can be prepared ahead of time, although it might lose some of its vibrant colour the longer it’s stored.

If preparing in advance of serving, store the potatoes, bean mixture and guacamole, separately, in air-tight containers in the fridge for up to three days. When it’s time to eat, reheat the beans in a skillet and the potatoes in the oven, assemble and top with guacamole and garnishes.

The recipe below serves four people but adjusts easily to feed more. I know for a fact this recipe is great to feed and please a hungry crowd. Simon and I prepared it for a gathering of 30 friends and family this past summer. It got rave reviews. Being able to prepare things in advance made it so much easier.

We served it alongside rice and a chunky homemade salsa.

stuffed sweet potato with beans and guacamole

Stuffed sweet potatoes with beans and guacamole (adapted from this recipe)

Spice-rubbed sweet potatoes:

2 medium sweet potatoes (about 9 ounces each)

1 tablespoon melted virgin coconut or vegetable oil

1/2 teaspoon salt

1/4 teaspoon cayenne pepper

1/4 teaspoon ground cumin

Bean mixture:

1 tablespoon melted virgin coconut oil or vegetable oil

1/2 teaspoon salt

1/4 teaspoon cayenne pepper

1/4 teaspoon ground cumin

1 red onion, coarsely chopped

1 garlic clove, finely chopped

1 (15.5-ounce) can black beans, rinsed, drained

3/4 cup vegetable broth

2 cups fresh baby spinach (frozen works, too.)

1 tablespoon fresh lime juice

Guacamole:

2 ripe avocados

3 tablespoons chopped cilantro

1 clove of garlic, finely chopped

2 tablespoons fresh lime juice

1 medium size tomato, diced

salt and pepper to taste

Topping:

1/4 cup crumbled feta cheese

chopped cilantro for garnish.

stuffed sweet potato with beans and guacamole

Preheat oven to 450°F.

Cut potatoes in half lengthwise and rub with oil and spice mixture. Arrange cut side up on a rimmed baking sheet lined with parchment. Roast until fork-tender, about 25 minutes.

Heat oil in a skillet over medium heat. Add onion and garlic. Cook and stir until onion starts to turn translucent, 2–3 minutes. Add beans, broth, salt, cayenne and cumin. Cook until liquid is reduced and beans soften, about 10 minutes.

Mash avocado and garlic in a bowl until smooth. Stir in chopped tomato, cilantro, lime juice, salt and pepper.

Add spinach and lime juice to bean mixture. Cook until spinach wilts, about 30 seconds.

Using the back of a spoon, gently push down in centre of each potato half to create a canoe.

Spoon bean mixture into potato halves, then top evenly with guacamole, feta cheese and remaining cilantro.

stuffed sweet potato with beans and guacamole

Oven roasted broccoli with garlic and lemon by Suzanne

oven roasted broccoli with garlic and lemon

The other afternoon I roasted a big bunch of broccoli and we ate it with our fingers, straight from the oven and right off the sheet. Delicious!

To make this finger-licking-good broccoli you toss the stem segments and florets in garlic, olive oil, lemon zest, red chili flakes and salt, and roast in the oven until crispy and slightly charred.

Drizzle with freshly squeezed lemon juice right before serving as a side dish or afternoon snack for three to four people.

oven roasted broccoli with garlic and lemon

Oven roasted broccoli with garlic and lemon (original recipe here.)

2 bunches or 4 good-sized stems of washed broccoli

5 tablespoons olive oil

1/2 teaspoon salt

Finely grated zest of a lemon

A few pinches of pepper flakes (optional)

3 small garlic cloves, minced

Juice of a lemon, to finish

Note: Increase or decrease the amount of garlic, lemon zest, lemon juice salt and chili flakes to suit yourself.

Heat oven to 425°F (220°C). 

Wash broccoli.

Peel the tough outer skin of stems and chop into segments.

Slice the florets or use your hands to break them into smaller segments.

In a large bowl toss florets and stems with olive oil, garlic, pepper flakes, salt and lemon zest until evenly coated.

Spread broccoli in an even layer in a large pan or cookie sheet lined with parchment.  

Roast for 20 minutes then flip and move pieces around for even cooking. Under a watchful eye roast another 10 to 15 minutes or until broccoli is as crisp and charred as you like it.

Shower with fresh lemon juice and eat immediately.

oven roasted broccoli with garlic and lemon

No-bake chocolate peanut butter squares, vegan and gluten free by Suzanne

no-bake chocolate peanut butter squares

My mother, a school teacher by profession, was a wonderful baker who baked regularly, in cool weather and in warm. At some point, she put a second oven in an unfinished room in the basement of our family home, which allowed her to bake molasses cookies, cinnamon rolls or blueberry pies on hot summer days and for the rest of house to remain cool.

We don’t have a second oven in our basement but I do have this dessert recipe that’s great to make no matter the temperature but especially great if you are craving a yummy dessert that requires no baking.

These no-bake squares are also the perfect package to deliver the winning combination of chocolate and peanut butter. They take no more than 15 minutes of prep time and they’re nourishing too. Especially if you select quality ingredients.

chocolate peanut butter squares, vegan

The base is made in the food processor with oats, dates, peanut butter and salt. I use lovely soft medjool dates and a wholesome peanut butter that’s a little on the runny side. I use large rolled oats but quick oats do the trick as well. If your dates are especially dry you might soak them for a bit in warm water. Otherwise, your base mixture might be dry and crumbly.

The top layer is made of gently melted chocolate (semi sweet, bitter sweet, milk or the dark stuff) and a bit of peanut butter.

I’ve also included a simple method for making your own chocolate using cocoa powder, maple syrup and cocoa butter. It’s divine and super easy to make.

chocolate peanut butter squares, vegan

No-bake chocolate peanut butter squares

Adapted from and inspired by this recipe.

Base:

2 cups old fashioned or quick oats

1 cup pitted soft dates, packed (if hard and tough soak in warm water and then drain)

1 cup peanut butter

1/4 tsp salt (or more to taste)

1 tsp vanilla extract

Line a 8 x 8 pan with enough parchment so you can easily lift the squares out of the pan when it’s time to slice them.

Place oats and salt into the food processor. Blend while adding the dates, a couple at a time until processed well. Mixture will still be dry.

Add peanut butter and vanilla. Continue to process for one to two minutes or until you achieve a big sticky mixture. If it’s too crumbly add a bit of water or more peanut butter

Warm your hands and press the mixture into a 8 x 8 pan lined with parchment paper .

Place in fridge or freezer while you prepare the top layer.

Top Layer (two options):

1 cup finely chopped cocoa butter

5 tbsp maple syrup

1/4 cup peanut butter

1/2 cup unsweetened cocoa powder

1 tsp vanilla extract (optional)

pinch of sea salt to sprinkle on top (optional)

Chop the cocoa butter. Place in a heatproof bowl set over a pot of simmering water. Add cocoa powder, peanut butter, maple syrup and vanilla. Stir occasionally.

When mixture is half way melted, remove from heat and continue to stir until everything is melted and well blended.

OR

1 cup finely chopped chocolate or chocolate chips

1/4 cup peanut butter

1 tsp vanilla extract (optional)

pinch of sea salt to sprinkle on top (optional)

Chop chocolate. Place in a heatproof bowl set over a pot of simmering water. Add peanut butter and vanilla. Stir occasionally.

When mixture is half melted, remove from heat and continue to stir until everything is melted and well blended.

Remove base from fridge. Pour on the melted chocolate and spread evenly with the back of a spoon or by tilting the pan from side to side to side to evenly distribute the chocolate. Sprinkle with sea salt.

Return to the fridge and let sit until slightly solidified but not so hard you can’t easily slice. When it’s time to cut, lift the squares from the pan and slice into bite-sized or large squares by pressing a warmed blade of a large knife down firmly and then dragging it back in a single motion.

Store in an air tight container in the fridge. I don’t know how long they will last because we eat them in a week or less. I imagine they will keep at least two weeks in the fridge and even longer in the freezer.

chocolate peanut butter squares, vegan

Power truffles by Suzanne

natural+light+suzanne,+power+truffles-6402.jpg

These truffles are the perfect treat to satisfy your sweet tooth and nourish your body. They’re easy to make so long as you have food processor.

natural+light+suzanne,+power+truffles-6391_1.jpg
natural+light+suzanne,+power+truffles-6400_2.jpg
natural+light+suzanne,+power+truffles-6410_3.jpg

Power truffles (from The Living Kitchen)

1 1/2 cups pitted dates 

1 cup raw walnuts

1/2 cup raw sunflower seeds

1/2 cup raw cocoa powder

1/2 tsp cinnamon

pinch of sea salt

2 tbsp virgin coconut oil, softened

1-2 tbsp water, if necessary

1 cup unsweetened coconut


Put walnuts and sunflower seeds in food processor and blend until coarsely ground. Be careful not to over process or the mixture will become oily.

Add cocoa, cinnamon and salt and process some more.

Next, add coconut oil and dates and blend until a dough forms. 

If you need to, add water, a tablespoon at a time, until the mixture is blended well and sticky enough to form into balls.

Scoop mixture out by the tablespoon and form into balls.

Put coconut in a bowl and roll each ball in it until completely covered.

*Notes:

Make sure to use fresh walnuts. Sometimes run-of-the-mill grocery store walnuts are bitter.

You can lightly toast the coconut for extra flavour.

Store in an air tight container in the fridge for 2 weeks or in the freezer for 2 months.

natural+light+suzanne,+power+truffles-6330_1.jpg

Deseeding a pomegranate; embrace the mess, reap the rewards by Suzanne

Although revered and held sacred by many religions and cultures since ancient times, the pomegranate was never on my radar growing up in eastern Canada.

At some point, as pomegranates became more available in grocery stores in Canada, I started noticing them, particularly from September to January when the ones grown in California are in season. The more I saw whole pomegranates in the shops, the more I noted their sculptural appeal. A thick leathery peel in shades of red, pink, yellow, orange and purple. An odd shape, bumpy and uneven with a funny tiny crown at one end. The first time I picked one up I was surprised by the unexpected weight. Evidence, I would later discover, of hundreds of seeds inside.

Still, the pomegranate remained mysterious and unfamiliar. I knew nothing about its rich history and it would be years before I would finally taste one.

The pomegranate is one of the world’s oldest fruits, believed to have originated in Persia as far back as 2000 B.C. and has been the source of inspiration for cultures all over the world. It’s represented in Greek and Roman mythology, biblical texts, Chinese folktales and in the sacred writings of Islam, and the fruit of choice on Rosh Hashana. Some scholars still debate whether the apple in the Garden of Eden was in fact a pomegranate!

In the art world, the pomegranate is found in sculpture, architecture, stained glass, mosaics, ceramics and textiles and depicted in paintings - usually in the hands of the Virgin Mary, the infant Jesus or a Greek goddess.

The first time I tasted pomegranate was unforgettable. Someone served me a festive cocktail brightened with tiny ruby-red jewels. When I bit into one it released a wonderful sweet-sour juice in my mouth. Now the pomegranate really had my attention!

The seeds’ healing properties have been extolled since ancient times and current scientific research confirms their remarkable nutritional benefits. The seeds have high levels of antioxidants, are rich in vitamin C, K, B-complex and i…

When I finally broke open a pomegranate I was entranced. Inside, hundreds of tiny red seeds, separated and hiding in a waxy membrane and spongy white pith.

The seeds’ healing properties have been extolled since ancient times and current research confirms their remarkable nutritional benefits. Lately, they outshine blueberries in terms of super-food status. They’re high in levels of antioxidants, rich in vitamin C, K, B-complex and in minerals such as copper, calcium and potassium.

The seeds are very versatile. They add colour, flavour and texture to salad, cocktails, dessert, roasted vegetables and grain dishes. You can turn them into juice, eat them by the spoonful or sprinkle them on your morning oatmeal. You can even make pomegranate molasses.

DSCF6159_2.jpg
DSCF6252_3.jpg

Getting to those seeds can be a messy business if you don’t have a good technique. Here’s an excellent method to deseed a pomegranate:

  1. You need a knife, a large bowl and a wooden spoon.

  2. Pomegranate juice stains! Protect your clothing as if you were about to paint.

  3. Roll the pomegranate around to loosen the seeds from the peel.

  4. Score the peel around the middle of the fruit, horizontally, with a sharp knife. Do not cut through into the seeds.

  5. Gently break open into two halves.

  6. Hold half of the pomegranate, with the seeds facing down, over a large bowl and thwack the skin with a wooden spoon.

  7. Gently squeeze to encourage the release of the seeds from the white membrane as you continue to thwack.

  8. Remove remaining seeds with your fingers or a spoon.

  9. Remove any bits of pith from the bowl.

DSCF6150_1.jpg
DSCF6157_2.jpg

Store seeds in a container in the refrigerator for a few days or in the freezer.

To freeze, spread seeds in a single layer on a parchment-lined baking sheet. Place in the freezer, uncovered, for about two hours. Transfer seeds to an airtight container and return to freezer. They should keep for several months.

Whole pomegranates look beautiful in a bowl on a counter top and will keep like that for up to two weeks. Keep them in the refrigerator for a few months.

DSCF5947_3.jpg

A spicy molasses cookie to nourish your soul by Suzanne

DSCF5625.jpg

I recently read about this exercise that asks you to make, draw or render a four-foot-tall totem pole of your life, including words, letters, maps, photos, objects, signs, etc.

I thought about it for a bit and decided a molasses cookie was an apt emblem for the warm and cozy parts of my childhood.

When I bake molasses cookies I’m transported. I’m a child standing on a chair at the kitchen counter helping my mother make a batch. When I smell them baking it’s as though I’m walking through the back door of our home on Janice Street and my mother is just pulling of sheet of them from the oven. The scent of cinnamon, cloves, ginger and nutmeg fills the air.

Funnily enough, in the early nineties I happened upon a cookie recipe not unlike the one my mother used. It came from an unlikely source - a 12th century medieval nun named Hildegarde of Bingen.

Hildegarde recommends you eat her spice cookies at least once a day to help lift melancholia, open your heart and bring you a sense of cheerfulness and joy. In particular, she credits nutmeg for the cookies’ positive effects. She writes,

Nutmeg has great heat and good moderation in its powers. If a person eats nutmeg, it will open up your heart, make your judgment free from obstruction and give you a good disposition. Take some nutmeg and an equal weight of cinnamon and a bit of cloves, and pulverize them. Then make small cakes with this and fine whole wheat flour and water. Eat them often. It will calm all bitterness of the heart and mind, open your heart and impaired senses, and make your mind cheerful. It purifies your senses and diminishes all harmful humors in you. It gives good liquid to your blood and makes you strong.”

DSCF5729.jpg

Here’s my updated version, a molasses cookie inspired by my mother and a 12th century mystic, spiced with cinnamon, cloves, ginger and nutmeg too. May the warm spicy goodness of these cookies help banish any gloom and elevate your mood in the days ahead.

DSCF5660.jpg

Spicy Molasses Cookies

1/4 cup coconut oil or butter

1/4 cup coconut sugar

1/4 cup cane sugar

I egg, slightly beaten

1/4 cup black strap molasses

1 cup spelt flour or all purpose flour

1 tsp baking soda

1/4 tsp salt

1 tsp ground cinnamon

1/2 tsp ground cloves

1 tbsp fresh ginger, finely chopped or grated OR 1 tsp dried ground ginger

1/2 tsp ground nutmeg, freshly ground if possible

extra sugar for rolling in (optional)

Preheat the oven to 350 degrees and line a baking sheet with parchment paper.

Cream the oil, coconut sugar and cane sugar until creamy. If using freshly grated ginger, add it here.

Add the beaten egg and molasses, and mix until combined well.

Mix the dry ingredients in a bowl.

Combine wet and dry.

Place the cookie dough in the fridge for at least 30 minutes or until the dough is easy to handle. It also helps to run your hands under cold water before rolling the cookie dough.

Roll equal sized portions of the dough into 1-inch balls.

Roll each ball in sugar to coat.

Place on the cookie sheet and flatten each ball with your hand or the bottom of a glass.

Bake for 10 minutes, until cookies begin to crack on top.

Remove and let cool.

Store in an airtight container.

Notes:

I baked this batch a little on the long side so they have a nice crunch without being too crunchy. If you want more chew than crunch, consider removing them from the oven just before they are finished baking and let them rest on the hot sheet for a couple more minutes.

If you don’t have any coconut sugar you can substitute regular sugar.

photos+57.jpg
IMG_6732.jpg

Dark chocolate-covered cashew cherry balls by Suzanne

These easy to make no-bake balls are delicious and nutrient dense; made with ingredients high in vitamins and minerals and with flavours to please your tastebuds.

Especially noteworthy is the tart cherry flavour, which balances the sweetness of the dates and pairs beautifully with the dark chocolate coating, if you choose to go that route.

Make a double batch and store them in the fridge to have on hand as a snack or after dinner dessert. Packaged thoughtfully they make a great hostess gift.

DSCF4285.jpg

I used raw cashews but you could use roasted ones.

DSCF4189.jpg

Make sure you use sour dried cherries. These are Montmorency cherries.

DSCF4197.jpg

If your dates are dried out soak them for 10 minutes in warm water. Drain well before blending.

I was out of the much preferred finely shredded coconut and made do with dried coconut chips. To avoid a longer processing time, I coarsely blended the coconut chips first before adding the cashews.

DSCF4455.jpg

Melt the dark chocolate gently. I used a metal bowl sitting on a pot of simmering water. Make sure the base of the bowl does not sit in the water and that only the steam is melting the chocolate.

DSCF4471.jpg

Dark chocolate-covered cashew cherry balls

Makes 20 to 24 balls

12 medjool dates, pitted

1 cup dried tart cherries 

1 cup shredded coconut, unsweetened

1 1/2 cup cashews, raw or roasted

1 tsp almond or vanilla extract

pinch of fine sea salt

4 ounces dark chocolate, melted (optional)

Add dates to food processor and blend until broken up into little bits.

Add coconut, cashews, cherries, extract and salt.

Pulse and combine until a sticky dough is formed. Be careful not to over-process or the mixture will become oily.

Using a spoon, scoop out the mixture and carefully roll into 1 to 1 1/2 inch balls using the warmth of your hands to mold them. Place on a cookie sheet lined with parchment paper.

Pop the cookie sheet of balls in the fridge for 10 to 15 minutes or until firm.

Roughly chop the dark chocolate. Place in the top of a double boiler or in a heatproof bowl set over a pot of simmering water. Stir occasionally.

When the chocolate is half way melted, remove from heat and continue to stir until the remaining chocolate melts. 

Dip each ball into the melted chocolate and roll around until completely covered (I use a spoon). Lift out and return to the parchment lined sheet.

Return to fridge and allow the chocolate to harden.

Store balls in an air-tight container or large zip lock bag for up to two weeks. Place in the freezer for longer storage time.

Remove from fridge five minutes before eating, or longer if stored in the freezer.

DSCF4271.jpg

Fruit and berry crumble, vegan and gluten-free by Suzanne

fruit and berry crumble, vegan and gluten free

A fruit crumble is easy to make and requires these three things: a greased pan that’s just the right amount deep, a fruit filling and a crumbled topping. 

Wash, prep and coarsely chop fruit of your choice, combine with berries, flavour, toss directly into a greased baking dish and scatter the crumble on top.

You can choose any fruit or combination of fruit and berries from any season. It’s fun to experiment but you may have to adjust the recipe accordingly. My favourite as of late is apple, strawberry and cherry. You don’t have to use fresh berries either. Frozen works perfectly well.

Another great pairing is apple and peach. To try this combination, in the recipe below, substitute the cherries and strawberries for 4 peaches and only one tablespoon of tapioca.

I add tapioca to help thicken the filling, especially if I’m using frozen berries.

When baking, make sure the filling is visibly bubbling before pulling it out of the oven. This will ensure the thickener has been fully activated. If concerned about bubbling over in the oven, place your dish on a cookie sheet lined with parchment paper.

Please note, this recipe doesn’t call for sweetener in the fruit filling but you might reconsider and add a little depending on what fruit you use. For example, if you use rhubarb you will want to add a little extra.

fruit and berry crumble, vegan and gluten free

Fruit and berry crumble, vegan and gluten-free

For the filling:

1 cup frozen cherries

2 cups frozen strawberries

3 large or 5 medium size apples.

1/2 lemon, zest and juice

1/2 tsp cinnamon

1/4 tsp freshly ground nutmeg

1 -2 tbsp tapioca (optional)

For the topping:

2 cups large rolled oats

1/2 cup almond flour

1/4 cup honey or sweetener of your choice

1/2 cup coarsely chopped walnuts

3/4 cup coconut oil or olive oil (I use a combination of both)

1/2 tsp salt

Preheat the oven to 350 F

Lightly grease an approximately 9“ x 7” baking dish.

Peel, core and chop fruit into chunky pieces. 

Place fruit and berries in baking dish and sprinkle with cinnamon and freshly ground nutmeg.

Add the lemon zest, juice and tapioca. Lightly toss and allow sit for at least 10 minutes while you make the topping.

In a large bowl place almond flour, rolled oats, walnuts, sweetener and salt. Mix with a fork to combine. 

Add the oil (or butter) and continue to blend. 

Sprinkle crumble topping over the fruit. Try to work on a depth half that of the fruit. Too thick and the middle won't cook.

Press the topping down with your hands or the back of a large spoon.

Place in preheated oven and bake for 40-45 minutes or until golden and you can see the fruit bubbling through from underneath.

Remove from the oven and let stand for 5 minutes before serving.

fruit and berry crumble, vegan and gluten free

Homemade chocolate peanut butter cups by Suzanne

If you’re a fan of chocolate peanut butter cups you will appreciate knowing it’s easy to make your own and tailor them to your specific preferences. 

I have only made these twice and I'm happy with the results even though there’s more tweaking I could do. For example, next time I will pour a little less chocolate in the bottom of each cup so the base is not quite as thick. 

Otherwise, the results are excellent.

DSCF3098.jpg

Here are tips to ensure your peanut butter cups turn out just the way you like them.:

I like to use dark chocolate but you may prefer milk or semi sweet chocolate. You can use chopped chocolate or chocolate chips. I’ve also included a recipe for you to make your own chocolate with cocoa butter, cocoa powder and maple syrup.

I use a natural peanut butter with no added ingredients. It’s runny so I thicken it with coconut flour to absorb the moisture. Depending on how thick or thin your brand of peanut butter is you can skip adding coconut flour. Or you may need a touch more or less than I use.

You could also use powdered sugar to thicken the peanut butter. If you use powdered sugar don’t add the maple syrup to the peanut butter filling and be selective about what type of chocolate you use. Perhaps one that’s less sweet.

I use silicon muffin tin liners that are 2 1/2 inches in diameter but you can use paper ones. You can also user a smaller size.

DSCF3142.jpg
DSCF3148.jpg

Chocolate Peanut Butter Cups

Makes 12 cups using 2 1/2 inch liners

Chocolate layer (two options):

1 cup finely chopped cocoa butter

3 to 5 tbsp maple syrup

1/4 cup peanut butter

1/2 cup unsweetened cocoa powder

1 tsp vanilla extract (optional)

pinch of sea salt

OR

1 3/4 cups (280 grams/10 ounces) dark chocolate, chopped

2 tablespoons coconut oil

Peanut butter filling:

3/4 cup peanut butter, creamy or crunchy 

2 tablespoons of maple syrup 

2 tablespoons coconut flour

salt to taste

Chop the cocoa butter. Place in a heatproof bowl set over a pot of simmering water. Add cocoa powder, peanut butter, maple syrup and vanilla. Stir occasionally. When mixture is half way melted, remove from heat and continue to stir until everything is melted and blended well.

OR

Melt the chocolate and coconut oil over a double boiler. Stir occasionally. When mixture is half way melted, remove from heat and continue to stir until everything is melted and blended well.

If using paper liners, insert into a muffin tin. Add equal amounts of melted chocolate to each cup and paint the inside of the liner with the melted chocolate - swish it around until it coats the sides, no more than halfway up the liner.

Place in the fridge to harden for 5 minutes.

Mix together the peanut butter, maple syrup, salt and coconut flour and stir until smooth. Let it sit for a couple minutes to firm up as the coconut flour will continue to absorb moisture with time. Add a touch more coconut flour if necessary. Or if it's too dry, add a touch more syrup. 

Add 1 generous tablespoon of peanut butter mixture to each cup. Press down to flatten. Cover the peanut butter with more melted chocolate and refrigerate for 15 to 20 minutes or until hardened.

Transfer to an airtight container. I store mine in the fridge and take out 5 minutes before eating.

DSCF3163.jpg

Tomato, corn and avocado salad by Suzanne

tomato, corn and avocado salad

This hearty salad is a feast for the eyes (all those colours!) as well as the appetite.

But before you get to enjoy it you must chop!

Maybe it’s a chore you dread and prefer to delegate. Or you might decide that chopping is part of the beauty of life. Using gorgeous fresh produce and a good sharp knife improves the chopping experience, too. I'm beginning to notice, when focussing on this simple task, a sort of peacefulness. 

tomato, corn and avocado salad

Serve this salad as a chunky guacamole with a large side bowl of corn chips or as a salad to accompany a main dish.

Throw in a can of rinsed black beans and you've got yourself a complete meal.

Tomato, corn and avocado salad

4 ears of corn (or the equivalent amount of cooked frozen corn, approx 2 cups)

4 ripe avocados, seeded, peeled, and 1/2-inch diced

4 tomatoes, 1/2-inch diced

8 green onion, thinly sliced or 1/2 cup diced red onion

1/2 cup freshly squeezed lime juice

1/4 cup chopped fresh coriander (or other herb of choice)

Salt and ground pepper to taste

Microwave the cobs in their husks for 3-4 minutes. Once cool, remove husks and chop the kernels off with the cobs lying on their sides. 

Chop remaining ingredients.

Gently toss the all the ingredients in a large bowl with lime juice, olive oil, salt and pepper, and chopped coriander.

Garnish with extra coriander. Squeeze a couple of sections of lime on the salad right before serving.

tomato, corn and avocado salad

Egg-stuffed tomatoes with pesto by Suzanne

DSCF2968.jpg

If you haven’t yet noticed I like recipes that are adaptable and versatile. This recipe works as a side dish, but if you double it you’ve got yourself a main course. Make this dish when you’re eating solo or need to serve a large crowd.

The recipe is easy to prepare but here are some important added tips:

If your tomatoes don't sit up right, slice the bottom tip off so they won’t roll around. 

Use large tomatoes, at least 3 inches in diameter.

Run a paring knife around the inner rim of the tomato, loosening up the flesh on the inside of the tomato. Use a small spoon and scoop out the flesh, juice and seeds. 

Don't waste the insides! Save them to make tabouli. Or blend with a little garlic and onion and mix into your pasta sauce.

Use store-bought pesto or make your own. Alternatively,  season the insides of the tomatoes with oregano, pepper and a little olive oil.

Don't fret about overflow. Some egg white might end up on the bottom of the baking sheet but don't let it bother you, although I suggest you line your baking dish with parchment for an easy clean up. 

I topped mine with crumbled goat feta and cracked black pepper. But any grated cheese will work as would bread crumbs, chopped parsley or green onion.

Egg-stuffed tomatoes with pesto

Adapted from this recipe.

Large tomatoes

Pesto

Eggs

Salt and pepper

Cheese for topping

Preheat oven to 350 F

Brush an oven proof dish with olive oil or line with parchment paper.

Cut the tops off the tomatoes and scoop out the seeds and flesh.

Sprinkle the insides with a little salt and place upside down on paper towel for 10 minutes to drain.

Place the tomatoes in the prepared dish. 

Put a spoonful of pesto inside each tomato or season the insides with oregano, pepper and a little olive oil.

Break an egg into each tomato. Add topping of your choice (grated cheese, crumbled feta, bread crumbs).

Bake for 25 minutes, or for less time if you want your eggs runny.

Garnish with parsley (optional) and serve.

DSCF2957.jpg
DSCF2961.jpg
DSCF2969.jpg

Chocolate layer cake with ganache and mashed raspberries, grain-free, dairy-free and refined sugar-free by Suzanne

DSCF1737.jpg

Even if you're grain, dairy and refined sugar averse you can still bake a delicious chocolate layer cake and eat it too.

For me this cake is the perfect amount of sweet. But, then again, I'm someone who tends to decrease the amount of sweetener called for in dessert recipes. The batter is sweetened with maple syrup and the ganache with big soft medjool dates and a wee bit of maple syrup. So feel free to increase both if your palate demands more sweetness.

This is a two layer version made with seven inch pans but you could do a triple layer with smaller pans.

Added bonus: this cake freezes beautifully. I warm a frozen slice in the microwave for about 45 seconds. It reminds me a bit of those chocolate molten cakes. Delicious!

Inspired by this recipe.

DSCF1742.jpg
DSCF1685.jpg
DSCF1756.jpg

Cake:

3 cups almond meal

1/3 cup cocoa

1 tsp baking soda

1 tsp sea salt

3 eggs

3/4 cup maple syrup

3/4 cup water

1 tbsp vanilla extract

Preheat oven to 350 degrees.

Prepare two 6 or 7 inch pans by greasing and lining with parchment paper.

In a bowl, combine the almond meal, cocoa, baking soda and sea salt.

Combine eggs, maple syrup, water and vanilla extract, and add to dry mixture. Stir.

Pour batter into prepared pans.

Bake for 25 minutes or until tooth pic inserted in the centre of the cake comes out clean.

Allow to cool before icing with ganache and topping cake with raspberry sauce.


Ganache:

4 oz 100% cocoa baking chocolate

4 tablespoons coconut oil (melted)

2 tablespoons maple syrup

1 cup coconut milk

9 pitted medjool dates

Over very low heat or in a double boiler melt coconut oil and baking chocolate. Once melted, remove from heat. Add to blender along with coconut milk, maple syrup and dates. Blend until consistency is smooth. Allow to chill in fridge until it becomes thick enough to spread (about 20 to 30 minutes.)

Raspberry sauce:

Mash 2 cups raspberries, add 2 tablespoons maple syrup and 2 tablespoons lemon juice.

Cook over low heat for 25 minutes.

Allow to cool; spread evenly on top of iced cake. Top with raspberries.

DSCF1769.jpg

Naturally sweetened chocolate vegan mousse by Suzanne

We need sweetness in our lives and, from time to time, in our mouths.

I was recently blessed with sweetness and reminded of life’s little pleasures by way of this dessert - a naturally sweetened chocolate mousse. It requires only six ingredients and is easy to make.

The sweetness comes from dates, which are balanced with creamy coconut milk, cocoa butter, dark cocoa powder, vanilla and sea salt.

DSCF08251.jpg
DSCF08332.jpg
DSCF08554.jpg

This recipe lends itself to small adjustments and gentle play. Nine dates are my sweet spot but you might stop at six. Add more cocoa powder for a deeper chocolate flavour or more sea salt.

Make this dessert a treat for your eyes as well as your tastebuds and serve it in pretty glasses.

Original recipe here.

DSCF08591.jpg
DSCF08392.jpg

Naturally sweetened chocolate mousse, vegan

Serves 6

1/2 cup + 1 tbsp unsweetened cocoa powder

3/4 cup chopped cocoa butter (or bittersweet/dark chocolate)

Pinch sea salt

1 14-ounce can full-fat coconut milk, divided.

1 tsp pure vanilla extract or cut in half lengthwise one 2 inch piece of a vanilla bean pod, scrape out the seeds and add directly. 

6-9 soft medjool dates, pitted. If you don’t have dates you could use maple syrup but mousse will be thinner.

In a small saucepan combine cocoa powder, cocoa butter (or bittersweet/ dark chocolate), salt and 3/4 cup coconut milk. 

Warm over medium-low heat and whisk to combine.

Once mixture is melted add remaining coconut milk and whisk to combine. 

Remove from heat and add vanilla.

Transfer the mixture to a blender. 

Add dates, one at a time. Taste after five or six dates. If needed, add more dates and blend on high until creamy and smooth. At this time, you could also add other flavours such as peppermint oil or a scoop of peanut butter.

Pour directly into serving glasses or transfer to a bowl and cover.

Refrigerate until thickened and firm, at least 4 hours.

To serve, enjoy as is or divide between serving glasses and add toppings of your choice. I topped mine with coconut whipped cream, raspberries and sliced strawberries.

Store leftovers covered in the refrigerator up to 5 days.

Almond meal muffins, three ways by Suzanne

DSCF9549.jpg

Recently, the convergence of beautiful fall weather, a craving for something made with pumpkin and finding this excellent recipe resulted in several days of muffin making. 

These muffins are nutrient dense and make a substantial snack between meals or as a breakfast on-the-go. Even so, they're surprisingly light in texture.

DSCF95202.jpg
DSCF95294.jpg

You can swap out the pureed pumpkin for diced apple and grated zucchini, or mashed banana, roughly chopped walnuts and dark chocolate chunks.

The variations seem endless, actually. I’m imagining a savoury one with goat feta and rosemary.

DSCF95141.jpg
DSCF95232.jpg

Almond meal muffins, diced apple

DSCF96584.jpg

Here’s a basic recipe you can adapt. Makes 12 muffins.

Basic recipe

3 eggs

1/2 cup maple syrup

1/3 cup olive oil

1/2 tsp sea salt

1/4 cup coconut flour

1 1/2 cups almond meal

1 tsp baking soda


Pumpkin muffins:

To wet mixture add I cup of pureed pumpkin, from scratch or canned.

To dry mixture add 1 tsp cinnamon, 1 tsp ground ginger and 1/2 tsp ground nutmeg.


Apple zucchini muffins:

To wet mixture add 1 cup grated zucchini and 1 apple, cut in small cubes.

To dry mixture add 2 tsp ground ginger.

Combine dry and wet mixture and fold in 1 diced apple.


Banana chocolate chunk muffins with walnuts:

To wet mixture add 2 small or 1 cup mashed ripe bananas and 1 tsp vanilla.

Combine dry and wet mixtures and fold in 1/2 cup walnuts, roughly chopped and 1/2 cup dark chocolate, roughly chopped.


Preheat the oven to 350 F' and grease a muffin tin or use liners.

In a large mixing bowl, combine the eggs, maple syrup and oil really well with an egg beater, electric beater or whisk. 

Depending on what kind you are making add either pumpkin puree, mashed banana and vanilla or zucchini.

In a separate bowl add the coconut flour, almond meal, baking soda, salt and (if using) spices. Whisk well.

Add dry mixture to wet mixture and combine well. Fold in either chopped chocolate and walnuts or diced apple.

Distribute the batter between cups. Bake on the middle rack for 25 to 30 minutes or until a toothpick comes out clean. 

Let cool before removing from the pan. 

DSCF95421.jpg
DSCF96842.jpg

Make granola from scratch by Suzanne

To each their own! Homemade granola lends itself to this truth beautifully.

I’ve been making granola lately and was reminded how easy it is to customize, how endlessly adaptable it is to substitutions that suit individual tastes and dietary needs.

It takes no time to make; 15 minutes of prep time and 35-40 minutes of watchful baking. Your place will smell amazing too.

Keep this rough ratio in mind when making your granola: 5 parts dry ingredients to 1 part wet. I've done 6 parts to 1 and it works, too. Feel free to gently play with the ratios.

The rest is up to you. 

Here’s a recipe to get you started:

Granola

3 cups large rolled oats (not quick-cooking)
1 cup roughly chopped walnuts, or other nut such as almonds or pecans
1/2 cup raw sunflower seed
1/2 cup raw pumpkin seeds
1/2 cup coconut chips or shredded coconut, unsweetened (if not using, add an extra 1/2 cup oats)
1/2 tsp cinnamon
1/2 tsp salt
1/2 cup maple syrup, honey, coconut nectar or brown rice syrup
1/2 cup warmed coconut oil or 1/2 cup extra virgin olive oil or a combination of both
1 cup dried cranberries, cherries, chopped apricots or raisins (to be added after baking)

Optional: 1/4 cup cocoa nibs or dark chocolate chunks (to be added after baking)

Preheat oven to 325 F. 

Mix dry ingredients ingredients in large bowl. 

Whisk wet ingredients and add to dry mixture. Combine well. 

Use a parchment-lined baking sheet or non-stick roasting pan. 

Spread your granola mixture out in an even layer. 

Bake, gently stirring every 15 minutes, until granola is golden brown and dry (35 to 40 minutes).

Remove from oven and add dried fruit and cocoa nibs. Wait until the granola is cool before adding chocolate chunks. 

Let the whole thing cool completely before transferring to a jar or other airtight container. Should keep up to three weeks. 

You can also freeze granola in an airtight container with as little empty space as possible. Freeze no longer than three months for best quality. Let frozen granola sit on the counter overnight before using. 

download1.jpeg
download2.jpeg
download3.jpeg

Notes:

Substitute rolled oats for spelt or quinoa flakes or a combination of the three. 

I like sunflower and pumpkin seeds, but you could use chia, flaxseeds or sesame seeds. 

Always use raw nuts and seeds.

If the intense flavour of olive oil is not for you, opt for an oil with a more neutral flavour such as grapeseed oil. 

One of the secrets to good granola is lower temperature baking. Certainly no higher than 325 F otherwise the risk of things burning increases. 

Make sure you add the dried fruit after you remove the granola from the oven. That way it stays nice and soft, not get tough and dried out.

If you plan on freezing your granola wait and toss in the dried fruit until you’re ready to eat it. Dried fruits get hard when frozen and thawed.