Naturally sweetened chocolate vegan mousse by Suzanne

We need sweetness in our lives and, from time to time, in our mouths.

I was recently blessed with sweetness and reminded of life’s little pleasures by way of this dessert - a naturally sweetened chocolate mousse. It requires only six ingredients and is easy to make.

The sweetness comes from dates, which are balanced with creamy coconut milk, cocoa butter, dark cocoa powder, vanilla and sea salt.

DSCF08251.jpg
DSCF08332.jpg
DSCF08554.jpg

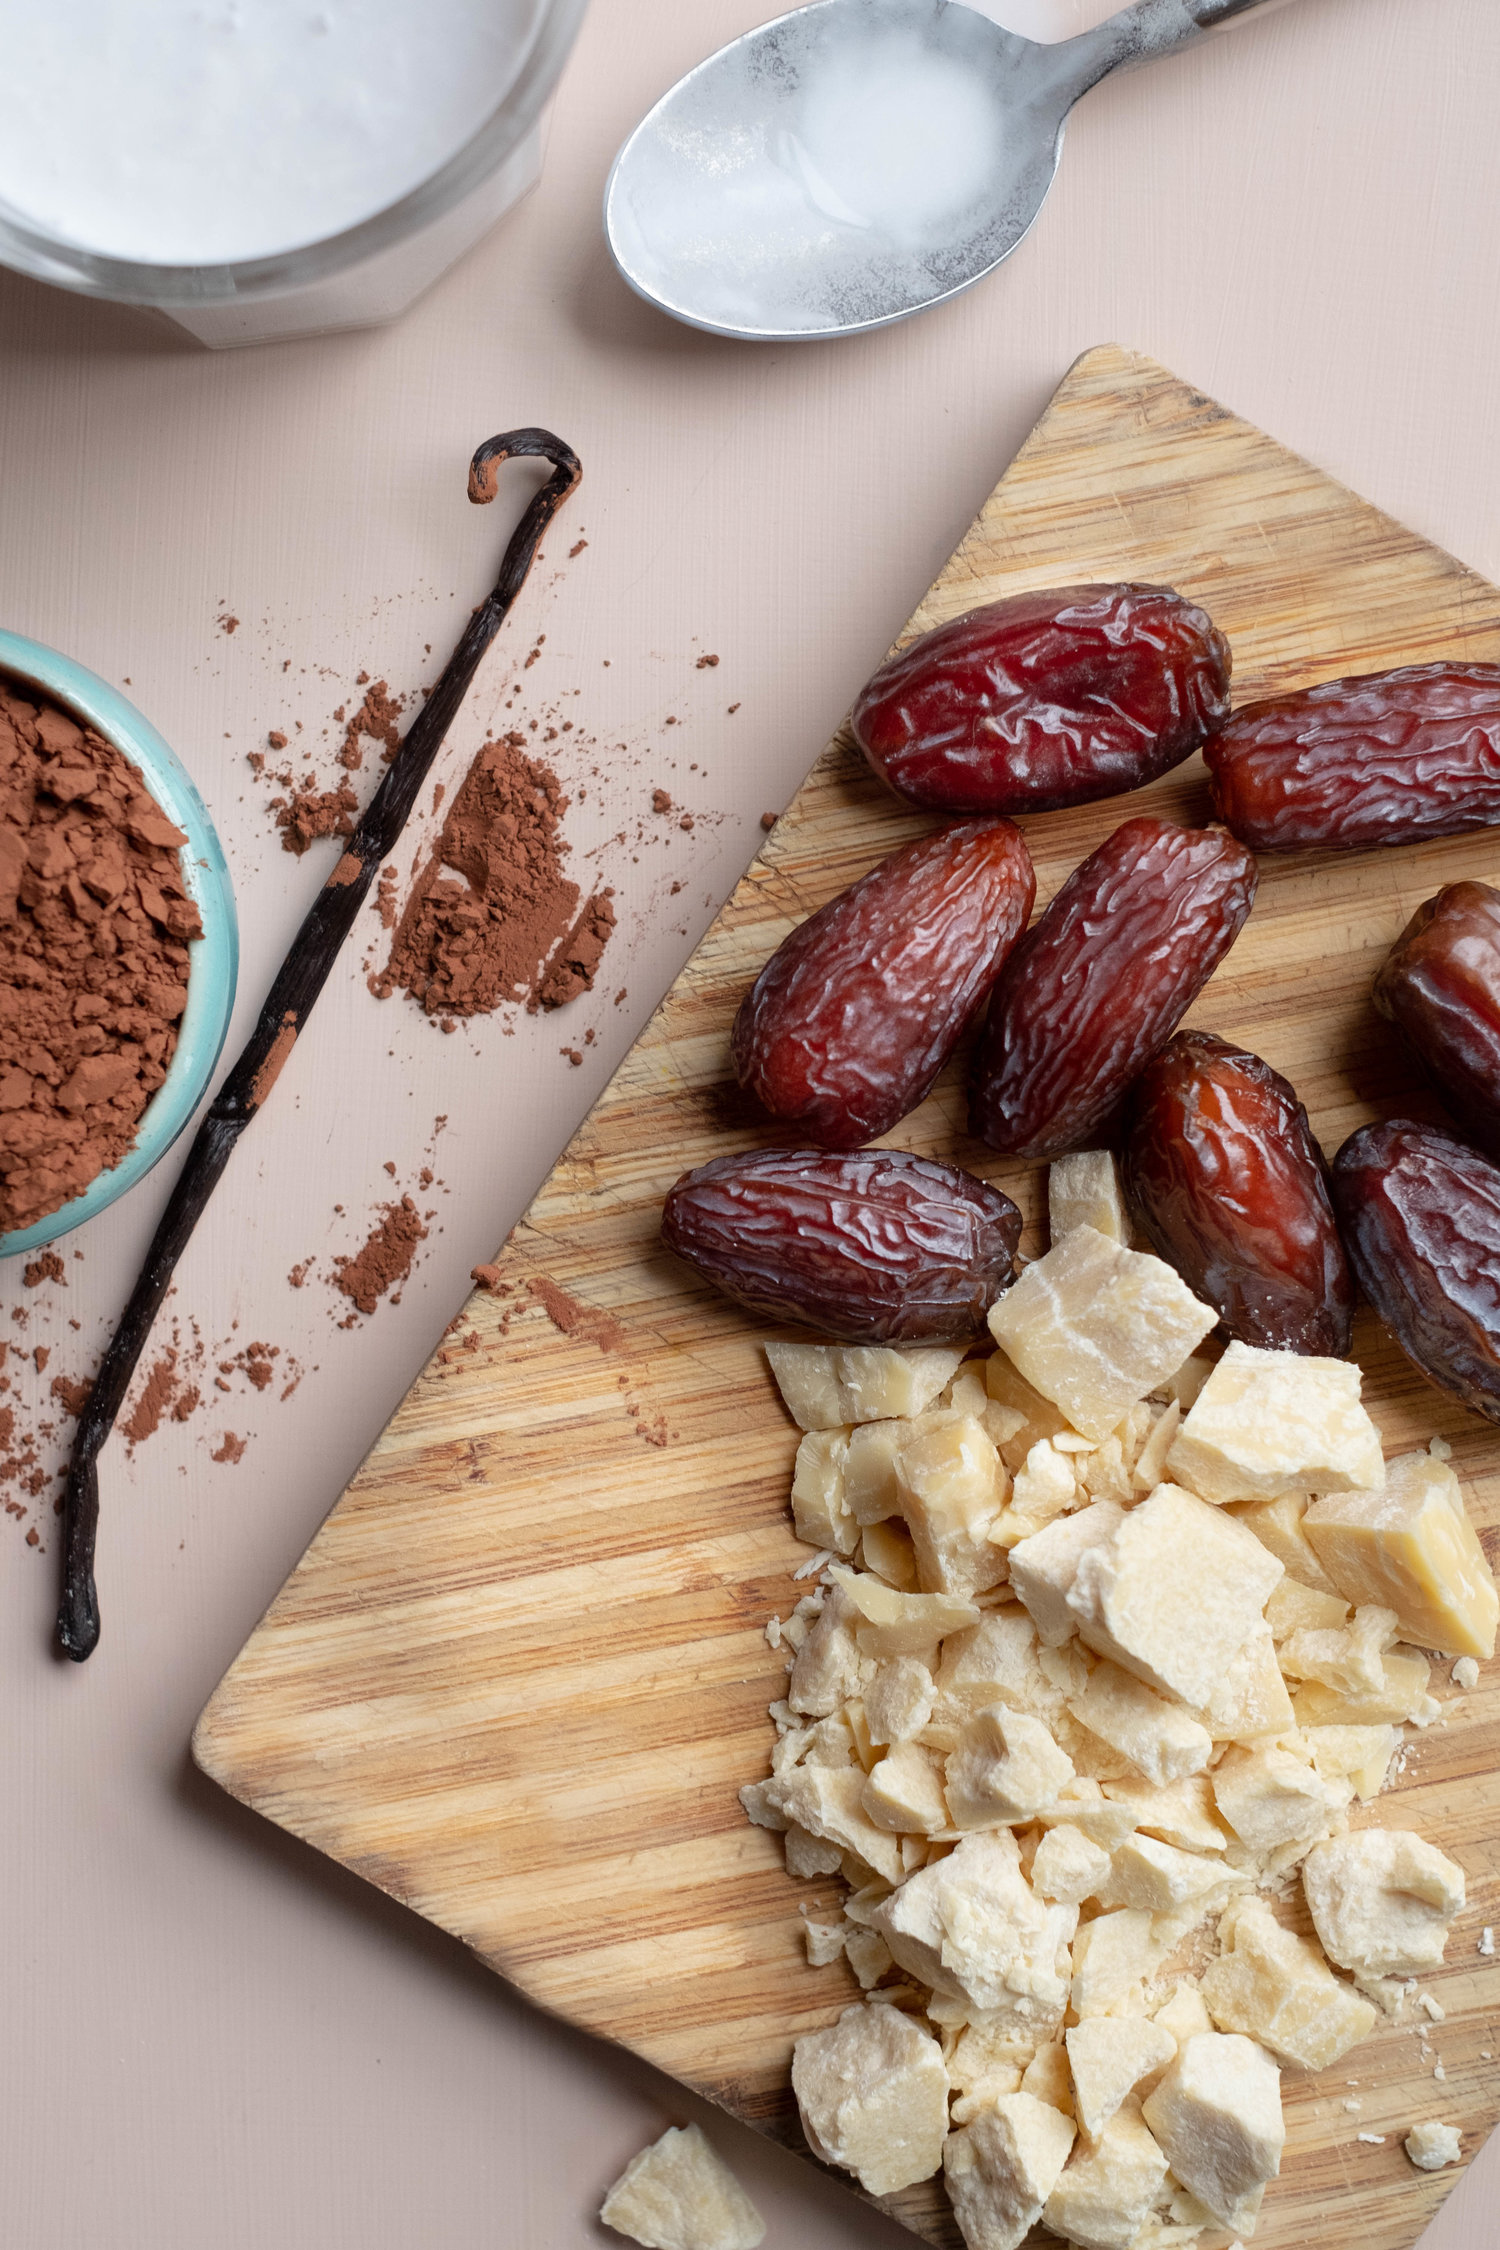
This recipe lends itself to small adjustments and gentle play. Nine dates are my sweet spot but you might stop at six. Add more cocoa powder for a deeper chocolate flavour or more sea salt.

Make this dessert a treat for your eyes as well as your tastebuds and serve it in pretty glasses.

Original recipe here.

DSCF08591.jpg
DSCF08392.jpg

Naturally sweetened chocolate mousse, vegan

Serves 6

1/2 cup + 1 tbsp unsweetened cocoa powder

3/4 cup chopped cocoa butter (or bittersweet/dark chocolate)

Pinch sea salt

1 14-ounce can full-fat coconut milk, divided.

1 tsp pure vanilla extract or cut in half lengthwise one 2 inch piece of a vanilla bean pod, scrape out the seeds and add directly. 

6-9 soft medjool dates, pitted. If you don’t have dates you could use maple syrup but mousse will be thinner.

In a small saucepan combine cocoa powder, cocoa butter (or bittersweet/ dark chocolate), salt and 3/4 cup coconut milk. 

Warm over medium-low heat and whisk to combine.

Once mixture is melted add remaining coconut milk and whisk to combine. 

Remove from heat and add vanilla.

Transfer the mixture to a blender. 

Add dates, one at a time. Taste after five or six dates. If needed, add more dates and blend on high until creamy and smooth. At this time, you could also add other flavours such as peppermint oil or a scoop of peanut butter.

Pour directly into serving glasses or transfer to a bowl and cover.

Refrigerate until thickened and firm, at least 4 hours.

To serve, enjoy as is or divide between serving glasses and add toppings of your choice. I topped mine with coconut whipped cream, raspberries and sliced strawberries.

Store leftovers covered in the refrigerator up to 5 days.

New life for an old room by Suzanne

DSCF0699.jpg

Houses, unless properly cared for, fall into a state of disrepair. 

Our house is 120 years old. When we bought it 14 years ago we noticed the floor in the room at the back was slightly sloped. It was strange to see water in a glass, sitting on a table, resting at an angle. 

Although the sunniest room in our home - it faces south and catches all the afternoon sun - it’s rather chilly in the winter, especially the floor. That’s because it doesn’t sit on a foundation. 

Despite its quirks and deficiencies, we managed to live in and make the most of this room until its flaws could no longer be ignored. Indeed some investigation revealed wood was rotting and something needed to be done.

IMG_09161.jpg
IMG_E08162.jpg
IMG_11373.jpg
IMG_11404.jpg
IMG_18405.jpg

Rather than tear it down we opted to correct and repair. We set out to level the floor and remove any rotting wood. The exterior was then newly shingled. 

We also installed a new door and upgraded windows (newly configured). 

As for the floor, ceramic tiles that resemble wooden planks are heated from underneath when the temperature drops. Our toes need never be cold again. 

IMG_30971.jpg

I gave the room a fresh coat of paint - a blush colour I’ve been eager to try. 

Rather than buy new furniture right away or invest in re-upholstering, we are making do with what we have elsewhere in our home and garage.

Furniture with fabric ravaged by cat claws is now disguised. I stitched a slip cover (very challenging!) for an old tub chair and draped the chaise longue with painter’s canvas.

I also used painter’s canvas (which I dyed years ago) to make the curtains and lined them with white cotton bed sheets.  It surprised me to see how perfectly they match the wall colour, as if I somehow knew.

DSCF06331.jpg
DSCF06842.jpg
DSCF06863.jpg
DSCF07054.jpg
DSCF07325.jpg
DSCF07146.jpg
DSCF07317.jpg
DSCF07268.jpg
DSCF07299.jpg

Even the light fixture is a hand-me-down from another room in the house, which we previously spruced up with new lighting. 

Look out the windows and you will notice a yard that needs some love and attention too, which is next on our agenda.

DSCF06451.jpg
download2.jpeg

This and that by Suzanne

Here are five things that caught my attention lately:

1. these yellow beauties

DSCF0585.jpg

because they remind me spring is inevitable.

2. this vibrant textile

DSCF0593.jpg

because it brightens up our dining room.

3. this shade of pink

DSCF0616.jpg

because I love it so much I bought another gallon.

4. this "room warming" gift

DSCF0582.jpg

because I have a creative and thoughtful friend.

5. this attempt at slip covering

DSCF0586.jpg

because it gave my brain a work out and to this torn up tub chair a second wind.

Noticed elsewhere:

what a character!

elevated leggings

when you share something, you risk losing it

addiction as a learning disability

the real iron man

me, elsewhere (page 10)

Make your own bath salts by Suzanne

It's nice to know relief from life's challenges can come in the simplest of forms. In this case, a soak in a salt water bath.

For thousands of years and across countless societies bathing has been one way to replenish the body. Salt water bathing supplements the body with minerals and nutrients, encourages detoxification and nourishes the skin.

It can even help ease a troubled mind. 

Today, we replicate this ancient wellness ritual by adding bath salts to a tub of warm water. You can use store-bought bath salts but it’s easy to concoct your own.

You can start with the naturally occurring mineral compound, magnesium sulfate, also known as epson salt. When you dissolve a cup or two of epson salt in a warm bath water and slide beneath the water's surface to soak awhile, the magnesium gets absorbed through your skin, which helps relax your tired muscles. The sulfate also improves the absorption of nutrients and flushes out toxins.  

Your mind is also eased because magnesium helps produce serotonin, a mood-elevating chemical in the brain that creates a feeling of calm and relaxation. 

Epson salts are inexpensive and easy to find. Most all pharmacies carry it by the bag with enough for several baths.

If you can find it, add some pink Himalayan salt to the mix. It offers up to 84 trace minerals and adds a beautiful splash of colour.

DSCF0322.jpg

Elevate the experience further by adding medicinal dried flower petals like calendula, chamomile or rose, along with a few drops of your favourite essential oil. You can usually find dried petals at bulk stores, health food stores and at many asian grocery stores.

DSCF0335.jpg

Add a scoop or two of bath salts directly to the water, climb inside and soak with the petals floating about. You could also use a simple cotton drawstring bag or make bundles of bath salts with squares of cheese cloth tied with string. It does make for an easier clean up of your tub.

DSCF0339.jpg

To make your own bath salts:

*Mix together equal parts epson salt, Himalayan salt and flower petals.

*Add one or two drops of essential for each cup of salt.

*Store in a jar with a lid.

*Add one or more scoops to your bath water (warm water for absorbing and hot for detoxing) or pour a scoop into a cloth bag and let it steep in the tub water.

*Sink beneath the surface and soak your troubles away.

*Consult with your physician before taking salt baths if you are pregnant or have a medical condition.

How to cherish sentimental items by Suzanne

DSCF6747.jpg

I'm not very sentimental but I love living amongst things that hold special meaning. 

There's no right or wrong way to live with items that hold memories and stories. But if you’re asking me, I say the best way to treat sentimental items is to make them part of your daily life. Or at least put them on display where you can admire them and they in turn can regularly spark your joy.

Hiding away objects of sentimental value may extend their shelf life, for sure. But it strikes me as an odd way to cherish something or to honour someone's memory.

DSCF89481.jpg

I inherited a bowl when we were clearing my parents' home several years ago. It was a gift to my mother from one of her sisters.

5573_111800399145_505969145_2100187_804543_n.jpg
APC_0214.jpg

Now the bowl is part of my daily life and I use it all the time. I know it would be safer stored away or left on the shelf unused. But then it wouldn't provide the same joy and meaning from using it. 

Anyway, I've already come to terms with knowing things break. Plus, if anything unfortunate should happen to the bowl I now have photos as souvenirs!

Here are a few more inherited items of sentimental value and how I put them to work on the rgular.

Read about how to cherish common household objects here

DSCF7175.jpg

My mother's china tea pot is for more than just serving tea.

DSC_93381.jpg

I painted these egg cups and gave them to my parents years ago. Now they're mine and do double duty.

DSCF6614-2.jpg

Made more than 30 years ago from squares my grandmother knit and my sister crocheted together, today this old blanket provides comfort to feline family members.

bowl.jpg

This and that by Suzanne

Here are five things that caught my attention lately:

1. this fresh turmeric root

DSCF9970.jpg

because it's a wonderful anti-inflammatory i've been blending with my juices.

2. this inexpensive grocery store find

DSCF9979.jpg

because it's both culinary and cosmetic.

3. this light fixture

APC_0209.jpg

because it's a functional work of art.

4. this ice 

IMG_2764.jpg

because I finally got out for a long skate on the world's largest skating rink.

5. this bedside space

DSCF9963.jpg

because I'm only now realizing how nice the morning light is.

 Noticed elsewhere:

I see a blush coloured room in my future.

a wardrobe of jeans and tee shirts is appealing.

love his moves and how he ends this speech.

an apology offered and accepted.

believe in six impossible things per day.

thoroughly loved watching this.

How to host an ornament exchange party by Suzanne

DSCF9805.jpg

Last week, I attended an ornament exchange party with about 20 other women. My friend Cindy has been hosting it for more than 10 years and I've never missed it, yet. Four years ago, I started bringing my camera with me to try and capture the magic of the evening . See here, here and here.

A cookie exchange party is a good idea too but it requires more commitment from guests. It's fine if you love to bake, have a fail-proof cookie recipe up your sleeve and ample time to bake more than a few dozen cookies. But there's no denying the potential for stress in preparing to attend. 

An ornament exchange party demands much less.  Bringing a wrapped ornament is very doable and unlikely to get you frazzled. For starters, an ornament is affordable; it's easy to find a nice one for $10.

Plus an ornament is a potent symbol of the holiday and shopping for one can help you tap into the spirit of the season. I know it helped me. Browsing a selection of ornaments and finding one you fancy (and think someone else might fancy, too) is a pleasant experience. It's also fun to spot the trends. Felt ornaments continue to be popular, at least here in Ottawa.

There's no one way to host an ornament exchange party. However, after watching Cindy do it year after year I've gleaned a few things on how to make it a good one.

Set the date. and create a guest list. I read somewhere that the number of guests should be large enough so everyone stands or small enough everyone has a place to sit. Cindy invites at least 20 women. 

There are no guidelines for the time of day. In the early years, Cindy hosted the exchange on a Friday afternoon while our kids were in school. The party ended just before the bell rang and we'd hurry out the door to collect them in the school yard. Now it’s in the evening, which has its own set of charms.

Send out invitations. Cindy created her invite with a photo of the wreath on her door using Pic Monkey and sent it through email. A good rule of thumb is to send the invitations two to three weeks before the event, especially if you expect replies.

Christmas1.jpg

Remind everyone to bring a wrapped ornament. You can state a budget but my experience is people intuitively know a reasonable price point. 

Decorate your home before the party. There's something magical about being in a home decorated for the holidays. Giving guests an extra sensory boost with holiday decorations creates a wonderful atmosphere for socializing. 

DSCF97321.jpg
DSCF97482.jpg
DSCF97543.jpg
DSCF97584.jpg

Have arriving guests place their wrapped ornament under the tree but don't do the ornament exchange immediately after everyone arrives. Allow time for guests to have a drink and enjoy the food and conversation. This is the only time of year some of us see each other so it’s nice to have time to say hello and get caught up. Initially we gather in the kitchen around the beautiful walnut-topped island.

DSCF9782.jpg

Good food and drink are a must. They elevate a party, especially when thoughtfully presented. For the last few years Cindy has served a signature drink made with champagne, cranberry juice, orange juice and lemonade, with lemon, cranberries and rosemary garnish.

DSCF97271.jpg
DSCF97292.jpg
DSCF97363.jpg
DSCF97444.jpg

Be sure to write a number for each guest on individual small slips of paper and put them in a hat or vessel.  We know it's time to for the ornament exchange part of the evening when the hat appears and gets passed around. It's the equivalent of flickering lights at a theatre to signify intermission is ending. Everyone slips their hand in and pulls a slip of paper with a number on it, which tells you when it’s your turn to select an ornament from under the tree. Then we gather in the dining room around the dessert table and Christmas tree. 

DSCF97561.jpg
DSCF97662.jpg
DSCF97643.jpg

Call each number and take turns choosing a gift from under the tree. Watching as each ornament is unwrapped and revealed for all to see (there's lots of oohing and ahhing) is a highlight and a nice way to end the evening. 

DSCF98191.jpg
DSCF98172.jpg

Everyone goes home with an ornament (and maybe a napkin full of desserts!) and the anticipation of doing it all again next year.

I always leave with an enhanced sense of belonging, too. Gathering at Cindy's for an annual ornament exchange always helps me find my holiday spirit but it also reminds me I belong to a community of mothers, even if we only see each other once a year.

Almond meal muffins, three ways by Suzanne

DSCF9549.jpg

Recently, the convergence of beautiful fall weather, a craving for something made with pumpkin and finding this excellent recipe resulted in several days of muffin making. 

These muffins are nutrient dense and make a substantial snack between meals or as a breakfast on-the-go. Even so, they're surprisingly light in texture.

DSCF95202.jpg
DSCF95294.jpg

You can swap out the pureed pumpkin for diced apple and grated zucchini, or mashed banana, roughly chopped walnuts and dark chocolate chunks.

The variations seem endless, actually. I’m imagining a savoury one with goat feta and rosemary.

DSCF95141.jpg
DSCF95232.jpg

Almond meal muffins, diced apple

DSCF96584.jpg

Here’s a basic recipe you can adapt. Makes 12 muffins.

Basic recipe

3 eggs

1/2 cup maple syrup

1/3 cup olive oil

1/2 tsp sea salt

1/4 cup coconut flour

1 1/2 cups almond meal

1 tsp baking soda


Pumpkin muffins:

To wet mixture add I cup of pureed pumpkin, from scratch or canned.

To dry mixture add 1 tsp cinnamon, 1 tsp ground ginger and 1/2 tsp ground nutmeg.


Apple zucchini muffins:

To wet mixture add 1 cup grated zucchini and 1 apple, cut in small cubes.

To dry mixture add 2 tsp ground ginger.

Combine dry and wet mixture and fold in 1 diced apple.


Banana chocolate chunk muffins with walnuts:

To wet mixture add 2 small or 1 cup mashed ripe bananas and 1 tsp vanilla.

Combine dry and wet mixtures and fold in 1/2 cup walnuts, roughly chopped and 1/2 cup dark chocolate, roughly chopped.


Preheat the oven to 350 F' and grease a muffin tin or use liners.

In a large mixing bowl, combine the eggs, maple syrup and oil really well with an egg beater, electric beater or whisk. 

Depending on what kind you are making add either pumpkin puree, mashed banana and vanilla or zucchini.

In a separate bowl add the coconut flour, almond meal, baking soda, salt and (if using) spices. Whisk well.

Add dry mixture to wet mixture and combine well. Fold in either chopped chocolate and walnuts or diced apple.

Distribute the batter between cups. Bake on the middle rack for 25 to 30 minutes or until a toothpick comes out clean. 

Let cool before removing from the pan. 

DSCF95421.jpg
DSCF96842.jpg

Make granola from scratch by Suzanne

To each their own! Homemade granola lends itself to this truth beautifully.

I’ve been making granola lately and was reminded how easy it is to customize, how endlessly adaptable it is to substitutions that suit individual tastes and dietary needs.

It takes no time to make; 15 minutes of prep time and 35-40 minutes of watchful baking. Your place will smell amazing too.

Keep this rough ratio in mind when making your granola: 5 parts dry ingredients to 1 part wet. I've done 6 parts to 1 and it works, too. Feel free to gently play with the ratios.

The rest is up to you. 

Here’s a recipe to get you started:

Granola

3 cups large rolled oats (not quick-cooking)
1 cup roughly chopped walnuts, or other nut such as almonds or pecans
1/2 cup raw sunflower seed
1/2 cup raw pumpkin seeds
1/2 cup coconut chips or shredded coconut, unsweetened (if not using, add an extra 1/2 cup oats)
1/2 tsp cinnamon
1/2 tsp salt
1/2 cup maple syrup, honey, coconut nectar or brown rice syrup
1/2 cup warmed coconut oil or 1/2 cup extra virgin olive oil or a combination of both
1 cup dried cranberries, cherries, chopped apricots or raisins (to be added after baking)

Optional: 1/4 cup cocoa nibs or dark chocolate chunks (to be added after baking)

Preheat oven to 325 F. 

Mix dry ingredients ingredients in large bowl. 

Whisk wet ingredients and add to dry mixture. Combine well. 

Use a parchment-lined baking sheet or non-stick roasting pan. 

Spread your granola mixture out in an even layer. 

Bake, gently stirring every 15 minutes, until granola is golden brown and dry (35 to 40 minutes).

Remove from oven and add dried fruit and cocoa nibs. Wait until the granola is cool before adding chocolate chunks. 

Let the whole thing cool completely before transferring to a jar or other airtight container. Should keep up to three weeks. 

You can also freeze granola in an airtight container with as little empty space as possible. Freeze no longer than three months for best quality. Let frozen granola sit on the counter overnight before using. 

download1.jpeg
download2.jpeg
download3.jpeg

Notes:

Substitute rolled oats for spelt or quinoa flakes or a combination of the three. 

I like sunflower and pumpkin seeds, but you could use chia, flaxseeds or sesame seeds. 

Always use raw nuts and seeds.

If the intense flavour of olive oil is not for you, opt for an oil with a more neutral flavour such as grapeseed oil. 

One of the secrets to good granola is lower temperature baking. Certainly no higher than 325 F otherwise the risk of things burning increases. 

Make sure you add the dried fruit after you remove the granola from the oven. That way it stays nice and soft, not get tough and dried out.

If you plan on freezing your granola wait and toss in the dried fruit until you’re ready to eat it. Dried fruits get hard when frozen and thawed.

This and that by Suzanne

Here are five things that caught my attention lately:

1. this empty space

IMG_0916.jpg

because it's filled with possibility.

2. this boring and sagging addition

IMG_0932A.jpg

because it's about to get a face lift.

3. this fabric

DSCF9113Z.jpg

because it was once curtains, a slip cover and now napkins.

4. this sedum

DSCF9138.jpg

because it signals a shift in the season.

5. this infusion

DSCF8988D.jpg

Cookie dough tartlet shells, gluten-free by Suzanne

DSCF8720-11.jpg

The dry spell broke and, very last minute, we found ourselves inspired to invite friends for dinner. Here was my opportunity to use the lemon curd my friend and neighbour recently gave me, made with lemons grown in her yard in the south of France.

I decided to make lemon curd tartlets and to make the shells with cookie dough instead of pastry. I couldn't be more pleased with the results!

DSCF8707A.jpg
DSCF8713B.jpg
DSCF8728-1D.jpg

Cookie dough tarlet shells, gluten-free

Makes about 10 shells when using 2 1/2 inch wide liners

1 egg

1/4 cup coconut oil, melted and cooled, or very soft

1/4 cup raw honey or sweetener of your choice

1 tsp vanilla extract

2 cups blanched almond flour

1/2 tsp baking powder

1/4 tsp sea salt

Heat oven to 350 degrees.

Use a non-stick muffin tin, liners, or lightly grease a muffin tin for easy removal. I used silicon liners on a cookie sheet and they kept their shape well.

Mix egg, honey, vanilla, and coconut oil.

Whisk dry ingredients in a separate bowl and add to wet mixture. Combine well until a dough forms.

For a firm dough, chill in the fridge for 15-20 minutes.

Form the dough into small balls and press into each muffin tin or liner to form a cup shape.

Bake in the preheated oven for 9-10 minutes until the centers are almost done and they are light golden.

Remove from the oven and gently press down in the middle of each one with the back of a teaspoon.

Allow to completely cool on a wire rack before removing from liners.

You can fill the tartlets with berries topped with a dollop of whipped cream; chocolate mousse, or lemon curd. Find a recipe for lemon curd here.

Apple, pink grapefruit, strawberry and ginger drink: good for what ails you by Suzanne

DSCF8672.jpg

I always try to take extra good care of myself when life isn't in smooth sailing mode. Sometimes when I feel depleted I like to prepare myself a concoction containing a hit of concentrated vitamins and nutrients. I'm lucky in that I have a juicer and a blender.

DSCF67421.jpg
DSCF64942.jpg

The whole process of making myself a potent elixir feels balancing: choosing the recipe, preparing the fruit, pouring the drink into a beautiful glass, admiring the colour and the pleasing taste. I’ve even stopped dreading about having to clean the juicer and blender afterwards. Now cleaning and reassembling to be ready for next time is part of the positive exchange between me and my juice-making.

A favourite combinations is apple, pink grapefruit, strawberry and ginger. You can play around with amounts and the varieties of apples. You can juice everything or choose instead to blend it all and enjoy it as a smoothie (making sure to first remove seeds and any undesired peel).

For this recipe I juiced the apples and ginger and then blended with the whole grapefruit and strawberries.

DSCF6501.jpg
DSCF65052.jpg
DSC_29063.jpg
DSCF86701.jpg

Apple, pink grapefruit, strawberry and ginger drink

Makes two small drinks or one large.

6 strawberries, frozen or fresh

2 apples, juiced

1 pink grapefruit, peeled, sectioned and seeds removed

1 inch piece of ginger, juiced or blended

ice (optional)

Wash apples, slice and juice. Juice the piece of ginger. Pour juice in the blender. Add one whole grapefruit, peeled and seeded, and the strawberries. Blend well. Add ice if none of your fruit is frozen.

Pour into pretty glasses and garnish with peppermint.

DSCF7735Z.jpg

Raw caramel squares by Suzanne

raw caramel squares

I don't tend to visit the past unless something jogs my memory. When I bit into one of these raw caramel squares a vivid memory appeared:

I'm a university student hosting a small impromptu dinner gathering at the place I'm renting. For desert I serve the only sweet thing I have around: a frozen Mars bar.

It's frozen because it’s been sitting all day on the dashboard in my father's car in frigid winter temperatures. His car is in my driveway because he's in town for a meeting or convention and he bought the chocolate bar for two-hour car ride. I also remember that he was always loaning me his car. He was very generous about that.

Having nothing sweet in the house I run out and get the chocolate bar, bring it inside, cut it into thin slices with a heated butcher knife, arrange the pieces on a plate and serve.

raw caramel squares

Which brings me to this recipe.

Like that Mars bar I served for desert all those years ago, these squares are served straight out of the freezer, too.

What makes these squares special is the combined three layers, especially the caramel layer.

Unlike traditional caramel (usually made with sugar, water and cream) this one is made with dates, almond butter, maple syrup and a pinch of sea salt. Great if you want a caramel experience without the dairy.

You will need a food processor or blender to make this recipe.

Raw Caramel Squares

Base:

3/4 CUP (120G) ALMONDS

1/3 CUP (25G) DESICCATED COCONUT

6 FRESH DATES, PITTED

1/4 CUP (60G) COCONUT OIL, MELTED

Place the almonds, coconut, dates and oil in a food processor and process for 1 - 2 minutes or until the mixture resembles fine breadcrumbs. Press the mixture into the base of a 20cm x 20cm pan lined with parchment paper. Refrigerate until set.

Middle:

12 FRESH DATES, PITTED

1/3 CUP (95G) ALMOND BUTTER

2 TABLESPOONS MAPLE SYRUP

2 TEASPOONS VANILLA BEAN PASTE. I used vanilla extract and it worked fine.

PINCH SEA SALT FLAKES

Place the dates, almond butter, maple syrup, vanilla and salt in a food processor and process for 1 - 2 minutes or until smooth. Spread over the base and return to the fridge.

Top:

1/3 CUP (35G) CACAO POWDER

1/4 CUP (60ML) COCONUT OIL, MELTED

1/2 CUP (180G) RICE MALT SYRUP. Honey works as a substitute but makes it much sweeter.

Place the cacao, oil and rice malt syrup in a heatproof bowl over a saucepan of simmering water and stir for 2 - 3 minutes or until smooth. Pour the mixture over the date caramel and refrigerate for 2 hours or until set.

Freeze for 30 minutes before slicing into bars to serve. This recipe needs to be served chilled. You can also keep them in the freezer until ready to serve if you prefer a harder set.

DSCF7739Z.jpg

This and that by Suzanne

Here are five things that caught my attention lately:  

1. these lemons

DSCF7563-1.jpg

because I've been to the garden where they grew.

2. these tulips

DSCF7554.jpg

because I have friends who knows how to lift spirits.

3. this green tea

DSCF7713.jpg

because it unravels so beautifully.

4. this incense

DSCF7632-1.jpg

because it helps turns our home into an oasis of well-being.

5. this paella

DSCF7533.jpg

Chocolate and pear skillet cake, gluten-free by Suzanne

APC_0027.jpg

Here's my spin on a delicious cake known as torta di pere, adapted from this excellent recipe.

Mine is a gluten free version made with almond flour and honey instead of wheat and sugar. Plus I bake it in a cast iron skillet.

You can use a spring form pan but if you have a 10-inch cast iron frying pan give it a try. A cast iron skillet is an excellent baking vessel because cast iron enhances brownness and promotes a slightly crisp exterior. Baking this cake in a skillet results in a wonderful crust; the edges and bottom become golden and caramelized yet the inside is moist.

There's a learning curve to baking with cast iron. It gets very hot and stays very hot so timing is everything. Once you get the hang of it, you can really nail certain recipes, especially things you want soft in the middle with a nice crust, like a brownie.

You can pour your batter into a cool greased pan and then put it in a preheated oven. Or for best results, preheat the skillet by placing it in a cool oven and allowing it to heat as the oven heats before you grease it and add the batter.

DSCF7131-24.jpg

Chocolate and pear skillet cake, gluten-free

2 cups almond flour

1 tsp baking powder

1/2 tsp salt

4 eggs, separated. Beating the egg whites and then folding into the batter results in a lighter cake.

1/3 cup honey

6 tbsp olive oil or oil of your choice. Melted coconut oil or butter works, too.

2 tsp vanilla extract

3 pears, peeled and in a small dice. I use Bartlett pears.

3/4 cup dark chocolate chunks

Place 10-inch cast iron skillet in cool oven and turn oven to 350 F or 325 F if using convection. Allow skillet to heat for twenty minutes while you make batter.

In a small bowl mix almond flour, baking powder and salt.

In a larger bowl cream the eggs yolks, honey, oil and vanilla. Add the almond mixture and combine well.

Beat the egg whites and fold into batter.

Carefully remove the heated skillet from the oven and grease it by adding add 1 teaspoon of oil, butter or coconut oil, brushing to coat the bottom and sides.

Pour in batter and top with diced pear and chocolate chunks.

Return to oven and bake for 25-30 minutes or until golden brown and light to the touch. Doneness is more important than baking time so be sure to check by light touch or the toothpick method.

Remove from the oven and let stand for 10 minutes. Best served at room temperature or slightly warm.

Store any remaining slices in an airtight container in the fridge.

DSCF7128-1.jpg

Appreciate without panic by Suzanne

DSCF6877.jpg

Simon and I were smitten with this painting when we saw it hanging in a gallery one summer while we were on vacation. We were only there to look and left without buying it but, because it was still on our minds the next day, we returned to the gallery for one last look. And that was that. The painting became ours.

That was in 2004, around the same time a powerful tsunami hit the Indian ocean. Heart breaking stories of loss and destruction were all over the news. I remember looking up at the new painting we so cherished, now hanging on our wall, and I thought about how it too could be destroyed in a fire, flood, or some other unfortunate event.

Oddly enough the thought wasn't troubling. In fact, it put me at ease.

By imagining the painting damaged or gone it suddenly became even more appreciated and precious. I loved it very much but I also in that very moment said goodbye to it too. 

It wasn't that I now would allow myself to treat the painting with carelessness or neglect since it would it would, after all, someday be gone. It was that I was learning to appreciate it without panic.

DSCF6882.jpg

Exhibition kitchen/The Rockpool experience by Elaine Coffee

View life through a wabi-sabi lens by Suzanne

wabi sabi objects

Discovering a concept that describes an emotion your culture has no word for can help you make better sense of yourself and be more able to cope with life's stresses.

This happened to me several years ago when I discovered a concept deeply ingrained in Japanese society. It’s called wabi-sabi and expressed things I had no words for but long felt.

Wabi-sabi is pronounced wobby-sobby and is not to be confused with wasabi - the green condiment with the strong pungency eaten with sushi.

It’s notoriously hard to explain and there's no direct translation of wabi-sabi into English. That's because a wabi-sabi way of seeing the world is different from the way we typically see things in the West, especially when it comes to expressions of beauty, and if a culture lacks a word for something we can take that to mean it’s not considered important or significant.

wabi sabi
wabi sabi

wabi sabi

It’s easy to forget ideas of beauty aren't universal. In the West we lean toward Greek ideas about beauty, which focus on perfection - symmetry and proportion, glossiness, newness and freshness. Wabi-sabi shifts the meaning of beauty away from perfection and more towards authenticity.

Wabi-sabi is expressed in certain physical characteristics; it delights in things earthy, modest, organic, rustic, simple. Things that are withering or bear the mark of time are considered to be wabi-sabi.

DSC_7651-21.jpg

It helps to know wabi-sabi started out as separate terms.

The word sabi appeared in 8th century Japanese poetry. At its core, sabi is about flux and the limited mortality of all things. It celebrates the beauty of things withered. It honours the graceful toll living takes on everything - the aging of objects in nature as well as things made by hand from materials like wood, wool, clay and cotton. Autumn leaves, a fading flower, aged utensils and weathered wood are considered authentic and beautiful.

Wabi emerged in the 15th century as a reaction to the traditional Japanese tea ceremony, which was an expensive and lavish affair, and a means to show off wealth. The ceremonies, mostly involved the ruling class, were extravagant. Tea houses were gaudy and expensive imported goods were used.

The wabi way of tea is the opposite; humble, quiet, simple. Tea is served in locally fired bowls. Decor consists of natural elements such as bamboo and fresh flowers in weathered baskets. Beauty exists in the modest and imperfect. Hospitality not pretension is what counts above all else.

Now wabi and sabi are combined, interchangeable and shorthand for celebrating the imperfections of life, and peacefully accepting the natural cycle of growth and decay.

Wabi-sabi is often summed up in three truths:

nothing lasts,

nothing is finished,

nothing is perfect.

Maybe you find wabi-sabi too gloomy and grim a concept. Or maybe you're like me and find it unshakable.

There’s value in viewing life through a wabi-sabi lens. It's a way of engaging with life that, although bittersweet, puts me at ease. Accepting life as imperfect, unfinished and transient feels quite freeing.

Coconut flour pancakes by Suzanne

IMG_9408.jpg

Even if avoiding gluten is not essential for you or your family, I encourage you to try this recipe because it results in light, tender, and delicious pancakes.

Beyond taste and texture you can also love these pancakes because of the nutritional benefits of coconut flour. It's high in fibre and protein, rich in trace minerals and low in digestible carbohydrates.

Don't care for the taste of coconut? Not a problem; coconut flour doesn't have a strong coconut flavour.

Be warned, coconut flour does not work as a direct substitute for wheat flour and you need to treat it differently. Coconut flour, made from dried and ground coconut meat, is very very absorbent. You only need 1/2 the amount of coconut flour you would regular flour and you double the amount of egg.

This recipe doesn't make a large amount of batter but don't worry. A little goes a long way. These pancakes are exceptionally filling; two pancakes, especially when served with an ample side of berries, satisfy beautifully.

Hopefully there's coconut flour in a shop near you. This brand might be familiar.

See the original recipe here.

IMG_94071.jpg

Coconut Flour Pancakes (makes 6 small pancakes)

4 large eggs

1/4 cup of milk. I use almond but you could use cow's milk, soy or any other nut milk.

3 tablespoons oil. I use melted coconut oil or melted butter or ghee.

1/4 cup coconut flour

1 tablespoon sweetener - maple syrup, honey or sugar.

1/4 teaspoon baking powder

1/4 teaspoon sea salt

Heat a griddle or skillet over medium heat.

In a large bowl, use an egg beater or whisk to combine eggs, milk and oil. Add liquid sweetener here if using.

In another bowl, whisk the coconut flour, baking powder, salt and sugar (if using) until well blended.

Add the dry ingredients to the wet ingredients, stirring until no lumps remain.

Grease griddle or skillet with oil or butter.

Drop 1/4 cupfuls of batter onto the hot griddle.

Cook 3-4 minutes until small bubbles begin to form on top, then flip.

Cook on the other side 1-2 minutes more.

Serve warm with berries or topping of choice.

Drizzle with maple syrup.

Life changing crackers by Suzanne

life changing crackers

A gluten free cracker recipe is by far my most popular blog post. Not the recipe for Raw Chocolate Chewy Squares or Pineapple Upside Down Cake but a wholesome flaxseed cracker recipe.

I think this gluten free cracker recipe is even better.

I prefer the consistency of the dough and I prefer rolling the dough between sheets of parchment paper instead of trying to successfully spread it evenly with the back of a spoon.

These crackers taste truly wonderful. So much flavour and the satisfying crunch of a light crisp bread. The oatmeal and maple syrup lend them a subtle sweetness, too. What a bonus that they’re also high in nutrients and fibre!

Scroll to the bottom for a couple of my favourite topping ideas.

crackers-3.jpg
life changing crackers

Life Changing Crackers (original recipe here)

Makes about two regular size cookie sheets of crackers.

1 cup sunflower seeds

1/2 cup flax seeds

1/3 cup pumpkin seeds

1/4 cup sesame seeds

1 1/2 cup rolled oats

2 tbsp chia seeds

4 tbsp psyllium husks, 3 tbsp if you use powder

1 1/2 tsp fine sea salt

1 tbsp maple syrup

3 tbsp melted coconut oil

1 1/2 cups water

Preheat oven to 350 degrees.

In a large bowl combine dry ingredients.

In another bowl mix oil, maple syrup and water. Add to dry ingredients and mix well. If the mixture is too dry add more water, a little at a time. The dough should be thick but manageable.

Gather into one ball or two. Dividing dough into two balls gives you nicer sizes to manage, plus you can flavour each differently if you like.

Place the dough between two sheets of parchment paper. Using a rolling pin, firmly roll into a thin sheet. The thinner you can roll the dough without it ripping the better. Then you get a nice crisp cracker.

Remove the top layer of parchment and set aside for later use.

Score the dough into the shapes and size you want.

Grab the edge of the baking paper and slide onto a cookie sheet.

Bake for 20 minutes.

Remove cookie sheet from oven. Place the extra piece of parchment (from earlier) on top and flip over. Slide back on cookie sheet and bake another 10 minutes until dry, crisp and golden.

Let cool completely before storing in a lidded container for up to three weeks.

life changing cracker recipe
life changing crackers

Yellow roses and a three-legged cat by Suzanne

Capturing the beauty of yellow roses as they faded helped me tap into peace and calm, which I really needed these past few weeks.

I was distressed about one of our cats; Archie wasn't doing well and I feared the worst.

We adopted Archie from the Humane Society ten years ago. He's such a lovely animal, terribly handsome and with such a zen-like deposition. It's an understatement to say we're attached to him.

He's our therapy cat and we benefit from being around him. We look into his gorgeous green eyes, stroke his soft beautifully patterned fur, hear his roaring purr and we  instantly feel better.

Imagine our grief when we learned of a growing and painful bone tumour in one of his hind legs.

Amputation was recommended. It was expensive but it would put an end to Archie's pain, which was growing increasingly hard to manage, even with heavy painkillers. It would definitely prolong his life. But a life with three legs? Was it the right thing to do?

Something the vet said put us at ease: a cat doesn't look backwards to when it had four legs, it moves forward and adapts.

IMG_93991.jpg
IMG_93902.jpg
DSCF63974.jpg
DSCF64045.jpg

It's been almost three weeks since his surgery. His recovery is a wonderful thing to assist and witness. Being kind and tender has been the trend around here. I'm touched to see those qualities shine in my husband and kids.

He slept a great deal the first week but now he's more alert. We can tell by his ears - super perky! He gets out of his heated bed to eat and use the litter. His stitches are out and he doesn't have to wear the dreaded cone of shame anymore, thank goodness. He even manages going down the stairs on his own. And he grooms himself! It's a good sign because it suggests he's not depressed.

Further on in his recovery, when his wound has healed and his fur has grown back in, I'll post a video or two.

Archie's going to get along just fine with three legs instead of four and that makes us positively giddy with happiness.

DSCF64686.jpg